by andymelton | Mar 27, 2007 | Software
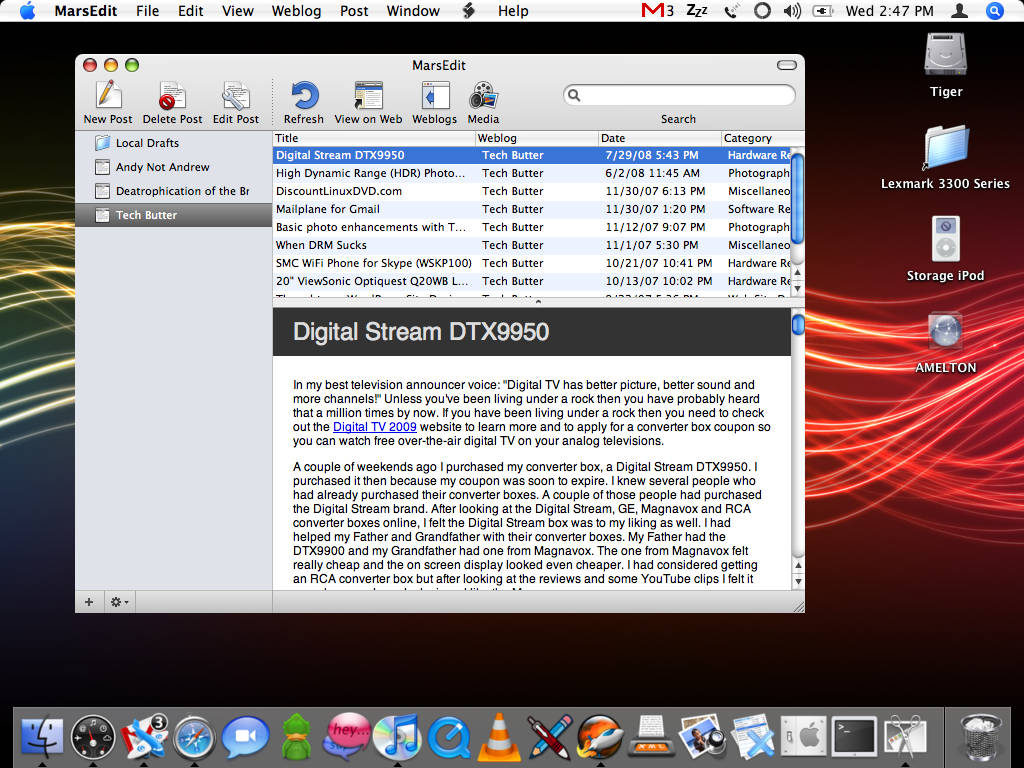
I was telling a friend about my experience with offline blogging software. He pointed me to MarsEdit. I hadn’t heard of it before, it wasn’t a free application. I usually don’t download anything but free software. This time I did download it and after using MarsEdit for a couple of weeks I decided to buy it. I have been using it ever since. I like it a lot and want to talk about what I like and some of the things that I would like to see in the application.
Why do I need this type of software?
You may be wondering what the point is in having offline blogging software. The main reason is because when I want to write a blog entry I hate having to open the browser, go to the blog, login and make a new entry. I’ve had bad experiences with writing blog posts and emails in the browser window. I am scared to death while I write my post the browser is going to crash! I know a lot of blogging software such as WordPress saves your post while you’re working on it. In my experience though, it’s never enough!
Another reason for offline blogging software is if you are like me and you have multiple blogs, it is really nice to be able to update them all from a convenient location. Currently, I have 4 blogs plugged into MarsEdit. Whenever I need to make a post on one of them I can simply open the application and make the post. Also, if I see a mistake that I have made in my entry it’s so much easier to open MarsEdit, make the change and re-submit instead of having to go to the browser, to the blog, re-login, etc. I can blog much more easily and more often!
What I like about MarsEdit
First of all I have to say I absolutely love the MarsEdit icon! I know I don’t talk about the icons of applications a lot but this is one of my absolute favorite icons. It’s very sexy on my dock!
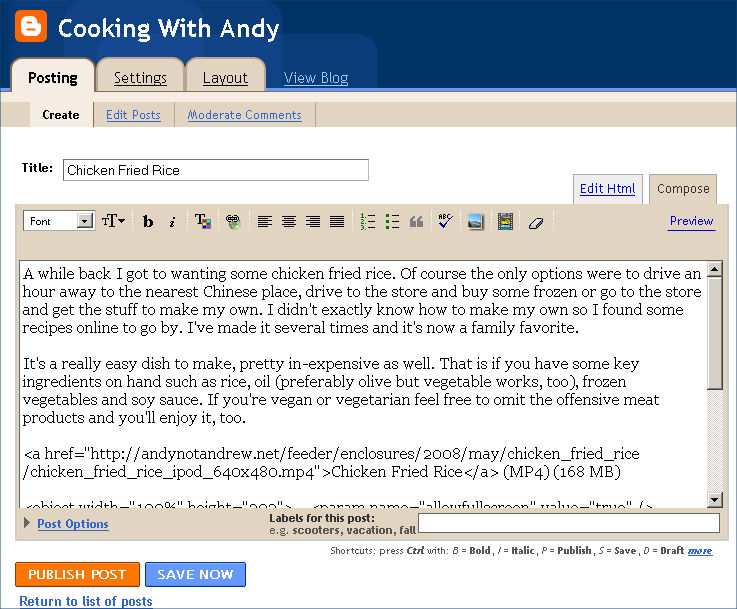
There are a lot of great features in MarsEdit but there are not a ton of icons cluttering up the application. It’s very simple and clean and I really like that. Instead of having an icon for every little thing there is a drop down menu with a lot of options for inserting HTML or custom tags. I also love the fact that there are keyboard shortcuts for a lot of these, especially the command to paste a link (Option + Command + A).
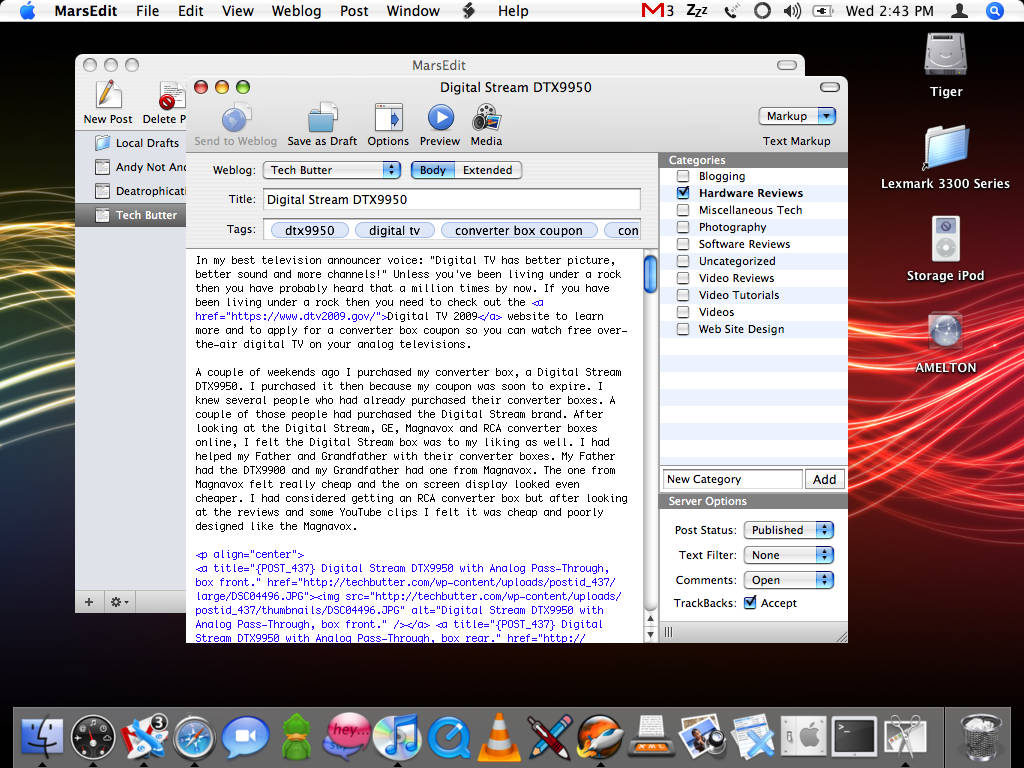
For each blog you have, you can set up different options. You can choose what warnings you want to receive before your entry is posted; such as warning you if you’ve not set a category or entered a title for your post. You can also choose which services you would like to ping to let the blogging world know that you’ve just made a new entry on your blog.
I also really like the simplicity of the “Save as Draft” button. You click the button as many times as you’d like while you are working on your entry. If you exit the application you can come back and work on it at a later time. But what I really like about it is the fact that whenever I finish the post and I post it to my blog it is no longer in my drafts folder. In my opinion it’s a much better option than using the typical “Save” or “Save As.”
What I’d like to see in MarsEdit
The first change to the application that I would like to see is whenever you are uploading images to your post that the application know which blog you are working on and upload to the appropriate folder.
Using MarsEdit you can choose whether people can leave comments & TrackBacks for your entries. However, you cannot make a password protected post, change the slug, or many of the other things you can do with a WordPress blog.
Although I really love this application and am glad that I made the purchase of it; there is one more thing that I would really like to see added into this application. That is the ability to make new categories. You can select from already created categories but you can’t make new ones (to my knowledge). I have to post the entry and then go to the website and add the proper categories. Granted, I’d have to go to the website anyways to make sure the entry was posted correctly. It would just be really nice not to have to log back in if everything else is correct just to add a category.
I know what you’re probably thinking after reading those two paragraphs above and I’m going to address it right now. Since this application is a cross platform (supports many content management systems) blogging tool; it would be extremely difficult to get every single option that all the blogging platforms offer into the application. I don’t think it would be impossible but it would be difficult because there are always new features to all of these blogging platforms. Also, I am sure there are some limits as to what developers can implement with some blogging systems due to the fact that some systems are closed source.
Do I recommend this application to others?
Yes, I most certainly do recommend it. Since purchasing the application I have blogged a whole lot more because of it. It’s so nice just to be able to open up an application and start blogging. I realize there are other applications out there, even free alternatives. In my opinion none of them can compare to the ease of use of MarsEdit or how fast it works (the others took FOREVER to launch and were very clumsy). MarsEdit offers a LOT of features, I barely scratched the surface! I feel as though my $24.95 was well spent!
MarsEdit from Red Sweater Software
Article update: Wednesday, October 1, 2008: I have updated this article with screen shots from the latest version. I also updated the grammar, at least, I tried to. I have been updating the screen shots on TechButter so that the pages look uniform with the new theme.
The image uploading tool has been improved. You can now specify which blog you are uploading to. When you do open the image uploading tool it connects to the blog you are currently working on. You can now choose from previously uploaded images or images in your catalog. Also, you can connect MarsEdit to Flickr and use images in your account.
The ability to make new categories has been added. Also, you can now change the post slug (what the URL of the post will be). You can also edit the post excerpt and the tags. To my knowledge there is no way to password protect a post using MarsEdit.
I have to be honest with you. Although I really love MarsEdit and have paid for the updated version, I don’t use it as much as I use to. If I were on my Mac more often I probably would. Since getting a new monitor for my PC I’ve been using my Windows machine as my primary workstation again and I post entries to my blog using my web browser. I do think MarsEdit is a great application and would highly recommend it to anyone looking for that type of functionality.
by andymelton | Dec 17, 2006 | Software
You’ve probably been listening to podcasts for a little while now and you’d like to start your own. You’re not sure about what you need to do to get started. I am going to assume that’s why you’re here. You’re wanting to know what type equipment and software you need as well as how hard it is to get going. That’s what I am going to discuss in this article.
There are so many different ways you can podcast. There are several hardware and software choices to make. In this article I am going to discuss how you can have a podcast for under $20 or if you already have a headset microphone, I’ll show you how to podcast for free.
Have an idea
I feel that the shows that succeed have something to talk about. They have information that will help the targeted audience. The great thing about podcasting is that it is a new medium and you have the power to help define what it becomes. You are not censored in any way and can say whatever you want.
If you’re recording about your day to day life, don’t just record what is going on. Record how you feel and your thoughts at that moment. In my opinion that’s better than someone rattling on about what they did that day.
Get an idea and roll with it. Don’t be too broad but don’t be too specific either. Also, the last piece of advice that I can give you is this: Don’t make the title of your show “daily” or “weekly.” Unless you are absolutely sure you can deliver content when your title says you will be delivering it. You will always feel guilty when you’re not delivering content when you said you would be.
Recording Yourself Talk
Location
Now that you’ve got a title and an idea it is time to start recording yourself. Before we get to the actual software we need to discuss a couple of things. First, you need to be in a relatively quiet location. The cheap headset that we’ve got is going to pick up background noise. Even the noise canceling headsets will pick up some background noise. You might want to turn off the heat or air conditioning, close the doors, windows and turn off any gadget you can live without while you’re recording.
Equipment
If you already have a headset microphone then you’ll be able to do a podcast for absolutely nothing. I think this is absolutely the best way to start out. Once you get comfortable with it you can start to add in more advanced equipment, software and hosting packages.

If you don’t have the headset microphone yet you’ll want to go ahead and purchase one. I have had great luck with Logitech’s Premium Stereo Headsets. I’ve owned a few of them so far. One thing to note is that you’ll probably have to replace these every couple of years. It’s not that they’re bad headsets it’s just that they get worn out over time. I’ve experienced this with every brand I’ve owned.
If you’re podcasting from a computer that does not have analog input/output ports you’ll need to get a USB headset. In the past I have had great results with the Logitech Premium USB Headset 350.
Also, don’t think that you need an expensive computer to record a podcast. I use to record an audio journal with my Toshiba Satellite 315 CDS. It had a 200MHz processor, 32 MB of RAM and a 2 GB hard drive. It recorded audio really well. It took a little bit longer to export the finished recording to MP3 but it wasn’t that bad. Not many people have a computer that old so I wouldn’t worry about the computer you use.
If you’re going to be recording yourself while you’re out you might want to invest in a portable audio recorder. Look for something that has a line-in or microphone port. I have had great results with my iRiver iFP-895. These are great, especially if you’re out and you get to thinking about something and want to record it.
Software
Most of the software I am going to mention in this article is cross-platform. That means that you can use it on Linux, Apple Mac OS X and Microsoft Windows. If you have a Mac that came with iLife then you’re already set. You can use GarageBand to record and publish your podcast. Skip over the Audacity, LAME, and ID3-Tag editing software sections of this article if you’re going to be using the iLife suite. If you don’t have iLife then I’ll help you get going with free software solutions available for the Mac and other platforms.
Audacity
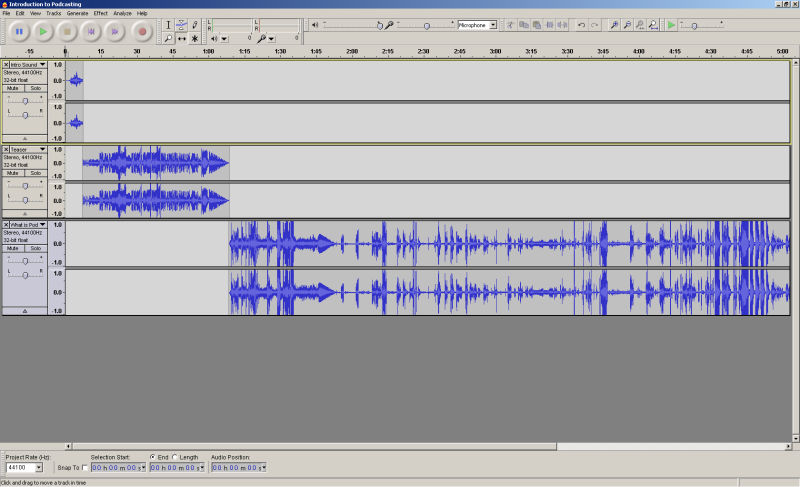
To record ourselves we are going to use Audacity. Some people say that Audacity is complicated and does not offer them all of the features that they want; they want the ability to play sounds while they are recording. I think Audacity is really simple to use. Regarding playing sounds while recording; this is not an issue for me because I just add in the audio after I have finished recording. I think Audacity is basic yet powerful at the same time and I highly recommend it.
When you download Audacity I would recommend getting the beta version. It has more features and is pretty stable. Just remember that it is beta software and may crash. Though, all software is prone to crashing in my opinion. Especially if you’re not on the latest and greatest hardware.
Lame Encoder
This will allow you to export MP3 files out of Audacity. There are different ways to get it working between the three platforms. I’ll tell you how to get going with it for each platform.
On Windows: The best place to get the lame_enc.dll file for Windows is from Free-Codecs. Download the file, extract and place somewhere on your hard drive; I usually put the folder in my Program Files directory. Open Audacity and go to Edit > Preferences and then find the section that says “MP3 Export Library Location” and click on “Find Library.” Navigate to where you placed the LAME files and locate the lame_enc.dll file. It should only show that specific file whenever you are navigating through the directories. Once you find it double click on it and you should be set.
On Mac OS X: You can download LAME from the official website but a much easier option is to download the LAME library from Spaghetti Code. Download the version that will work on your platform; extract and place it somewhere on your hard drive. I like to keep this in the Applications directory inside a folder called LAME, just for organizational reasons.
Go back into Audacity. Click on Audacity >> Preferences and below MP3 Export Setup click on Find Library. Navigate to the location you placed the file, double click on it and you should be good to go.
On Linux: The quickest and easiest way to get the LAME encoder on Linux is to install it through the application repositories provided for your distribution. The Audacity website has more details.
Configuring Audacity
If you’re not going to be playing music and you don’t require a super high quality version of your podcast you should change the bit rate of the audio to 96kbps from the default 128kbps. This will keep the file size smaller and allow your subscribers to download the file a lot quicker. It may also help keep your web hosting costs down. If you want to keep a higher quality version of the file you could export it as 128kbps (or higher) for archival purposes and export a lower quality version for publishing on the web. One of these days broadband will be more ubiquitous and you might want to release higher quality versions of your old podcasts.
Also, I always change the default setting of Mono recording to Stereo. If you’re just talking you can use Mono and your file size will be smaller. The reason I always change mine to stereo and leave it is because in the past I have forgotten to change it back to Stereo when I want to add music into the recording.
Recording & Exporting
Now that we’ve gotten Audacity properly set up, we can start recording! Remember, make sure you’re in the quietest location possible (unless you’re wanting to record a sound-seeing tour), keep the microphone close to your mouth but not too close (helps avoid popping), hit the record button and tell the world your story!
Once you have finished your recording you will immediately want to save your audio file as an Audacity Project File. Doing this will ensure that if your computer locks up or the power goes out you can access your recording and finish editing where you left off.
You can now add in any audio files such as intro music, exit music, etc by using the audio import function. When you import that audio just move it around to the desired location. If you want to edit out a section of audio, use the selection tool, highlight it and cut it out. This is very useful for taking out the “Uhmmms.”
Once you are satisfied with the recording you can export the file as an MP3 (under the file menu). Audacity will ask you to enter ID3 tags which we’ll discuss below.
ID3 Tagging Software
Now that you’ve recorded and exported your podcast as an MP3 you can now start to add things into that MP3 file that will define it using ID3 tags. You can add album art, title of the show, author, genre, recording date, comments, etc. These are all things that describe the content of your audio file. This information will help your audience identify your podcast in their audio library and help them keep things more organized.
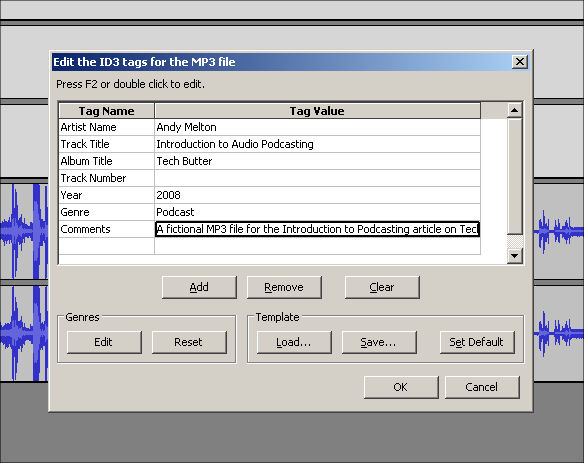
When you export a file from Audacity it will prompt you to enter ID3 tags for the file. Generally, the fields it gives you are enough information for a podcast recording. The only thing it won’t let you do is embed album art into the file. Album art is an image that will display in the media player window or on some portable media player screens while the file is playing.
If you’re using Microsoft Windows you can use a program called ID3-TagIT which will give you many more advanced tagging options. Once you have downloaded and installed ID3-TagIT you’ll navigate to the directory your MP3 file is located in. Once you’re in the directory select the MP3 file and edit the information on the left. If you need more fields click on “More.” Once you have added all the desired tags click on “Ok” and save the file.
Unfortunately, I’ve not been able to find an ID3 tagging application like ID3-TagIT for Mac OS X and Linux. The ones that I have found don’t give you anymore options than what you get with Audacity. However, for Mac OS X and Microsoft Windows you can edit ID3 tags with iTunes. Put the file into your Music library, right click on the file and click on “Get Info.” Edit the desired fields and close the window. Export the file out of iTunes (drag and drop somewhere), then upload to your hosting account. For those geeky Linux users out there you could try installing iTunes through Wine.
Content Subscription
One of the best things about podcasting is that you don’t have to tune in at a specific time and you also don’t have to remember to set the VCR to record the program. With podcasting people will subscribe to your podcast feed and whenever you publish a new episode the subscriber’s podcatching client will automatically download the file.
There are a couple of programs for Windows that allow you to create a custom feed with enclosures. The first being FeedSpring. It’s a really simple application. You download, install, create a new feed and then start adding items to that feed. Once you create a feed and save it you can upload the file to your hosting account and use it on FeedBurner or iTunes.
Another program for Windows is FeedForAll. This program isn’t freeware. I don’t have any experience with it but it does look like a good program for creating feeds. It’s also up-to-date. The latest version of FeedSpring is May 21, 2005 and the latest version of FeedForAll is from March 10, 2008 (as of this update to this article).
If you’re on the Mac you can also use FeedForAll. However, I’d also highly recommend a program by Reinvented Software called Feeder. I’ve used it for a couple of years now and think it’s a really great program. It’s not free but it’s worth every penny.
Unfortunately, for you Linux users out there I don’t have an application to recommend to you for feed creation. I wish someone would get on the ball with it!
There is an alternative to using feed creation software. This could be the option for you Linux users out there. Most blogging software now supports enclosures for each entry. With WordPress you can attach an audio, video or any other file and it will attach it to the feed. Even if you just put a link to the file somewhere within your blog post most feed readers will download the enclosure.
FeedBurner
This is an optional step but one that I highly recommend. Set up a FeedBurner account and tell FeedBurner where your feed is located. Then, give the URL of your feed that FeedBurner will give you to your listeners. The biggest reason for using FeedBurner is if you decide to move your feed later on, you can move your feed, update the location on FeedBurner and your listeners will never know and they won’t have to re-subscribe.
Also, FeedBurner makes it easier to get your podcast listed in iTunes. They also give you a lot of tools that you can use to promote your feed.
FeedBurner has some tracking abilities for your feed. In my opinion, these statistics are somewhat inflated so be skeptical of what FeedBurner says your subscriber number is.
Publishing your podcast
Once you have finished creating the feed, save it and upload it to a website somewhere. If you don’t have any web hosting, get some free hosting from somewhere and upload it there. The file will be small and the users won’t have to visit the site to get the file, if you’re using FeedBurner. Also, you’ll need to upload the actual podcast, the MP3 file you created.
Once you have the feed uploaded somewhere you can either submit it to iTunes through the iTunes Store, submit it through FeedBurner or if you’re using Feeder you can use it to submit your feed to the iTunes Store.
Web Hosting Account
The easiest way to publish your podcast is to purchase some web hosting or to use the hosting that you already have. There may be issues with this. One may be a lack of space or a lack of bandwidth. I am using GoDaddy web hosting to host all of my content. I have had very good luck with it and is very affordable. If you use a web hosting service like GoDaddy, just upload the file to the site and then in your feed creation tool, link the feed to the file on your server.
Mevio
You may not be able to purchase hosting. Don’t worry, there are free options out there. You could use Mevio to host your files. Mevio includes an ad at the beginning and end of audio files hosted with their service. It’s a decent trade off. You get free hosting and they get a little advertising in on your file. In my opinion, it’s not that bad. The great thing about Mevio is that the delivery network is great. Your files will be delivered to your subscribers very quickly.
If you use Mevio you won’t have to worry about creating the feed using a feed creation tool. However, I do highly recommend linking your Mevio feed to FeedBurner so that if you decide to host your media somewhere else you won’t have to worry about losing any subscribers during the transition.
Blogging your Podcast
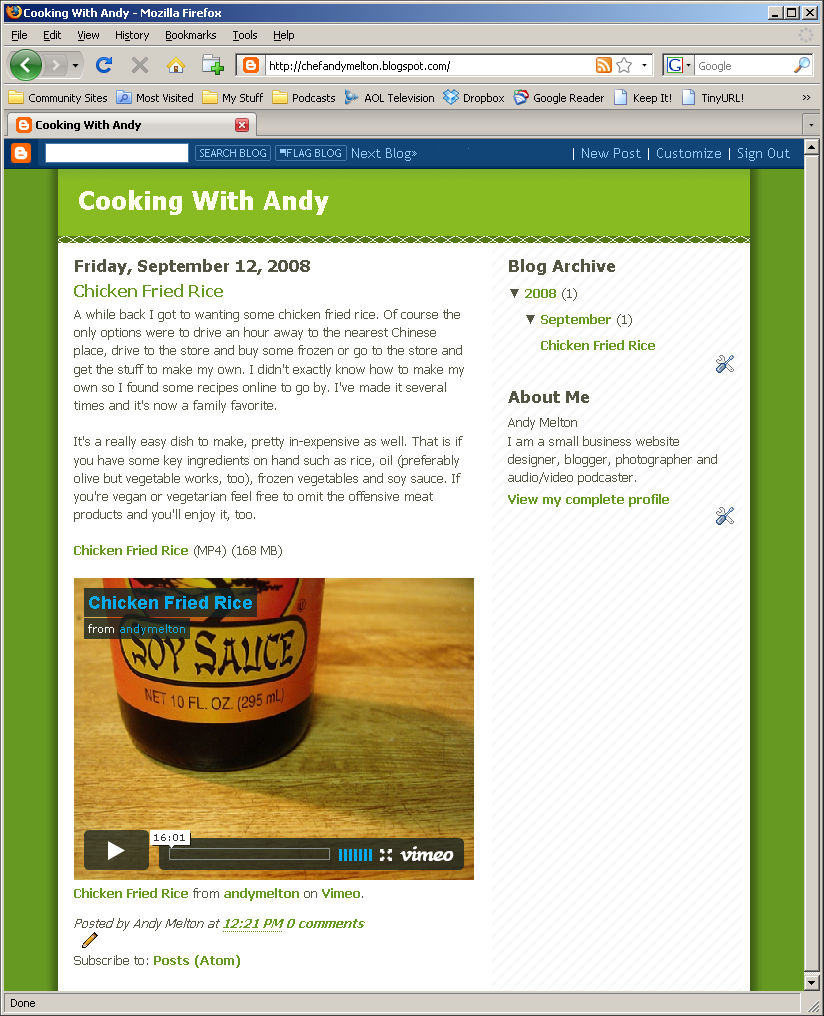
Now that you have your podcast recorded, added to a feed, published and all that. You need to add it somewhere so your subscribers can have a list of previous episodes and also leave comments on your episodes. If you already have a blog, add it there. If you want to keep it separate, make a new blog. If you don’t have any hosting you can use something like Blogger.com or WordPress.com (I would highly recommend WordPress.com as a free blogging site over Blogger.com).
Promoting your Podcast
Finally! You can start promoting your podcast! Join podcasting communities. Send emails to family, friends or co-workers. Make sure they know how to listen! Tell them how to leave feedback for you! It may take a little while for you to build up your listeners so don’t fret if people don’t comment immediately. It’s really hard to get people to comment on your stuff, trust me, I know! Just keep doing it! Get better at it! Most importantly, enjoy it!
Article update: Saturday, September 27, 2008: The original title of this article was “Podcasting on Windows.” I have since updated this article to encompass podcasting on the three major platforms (Linux, Mac and Windows) using free and open source software.
Please note that this article is not meant to be a tutorial. It’s meant to introduce you to podcasting and what is involved.
by andymelton | Nov 19, 2006 | Software
Recently a friend of mine asked me a few questions about blogging and I told them I would write an entry about blogging. I’m thinking I may start a new category and turn this into a series of articles because there are so many things I could talk about! Let’s get started!

Blog Ideas
- Recipe Blog – Instead of having scraps of paper with recipes on them floating around your home, why not take those recipes and put them on a blog? With most blogs you can put each post into a category. Your chicken casserole could be in a chicken category, a casserole category or both. You could post photos of the food with each entry. This is a great and inexpensive way to share family recipes. Printing costs can add up quickly.
- Computer Maintenance – You’ve finally fixed that nagging dialog box that keeps popping up every time you reboot your system. Why not make a blog entry about it so others can read how to stop it too!
Those are just a couple of the possibilities you could use your blog for. There are a ton of ideas out there. The sky is truly the limit.
Reasons for Blogging
- Save Time – How many times have you sent an email to someone explaining how to do something to only have someone else ask you the same question. Instead of emailing the person wouldn’t it be better or much easier to direct them to the entry on your blog where you already have the answer waiting for them? If you make an update to the blog entry every one can see the change and you don’t have to resend the information to everyone who wanted it.
- Discussion – Blogging software and services give you the option to allow comments on your entries. Your blog entry isn’t just a blog entry anymore, it becomes a discussion. Going back to the recipe blog. Your family and friends could comment on your recipes telling you how they prepared the dish and how it turned out for them. Maybe they had to use a substitute ingredient or they omitted an ingredient and got something totally different or a disaster!
- Syndication – Blogging software and services allow you to syndicate your entries across the Internet using using “Really Simple Syndication” (RSS). RSS allows your entries to be listed on thousands of websites across the Internet. If you’re wanting to get noticed this will definitely help.
- Subscription – Using RSS, readers of your blog can subscribe to your content using your blog’s built in RSS feed. Every time you post a new entry onto your blog the reader will be notified. Reader’s can subscribe in a variety of ways: using RSS reader software, an online feed reader or by subscribing to the feed in an email program that supports RSS feeds. With WordPress your users can even subscribe to the comments of each article. This lets your readers stay on top of the discussion and notifies them if you respond to their comment.
Blogging Options
Free Solutions
- Blogger.com – This service (offered by Google) allows you to set up a blog in a very short amount of time. It’s free and it’s hosted by Google. It is limited, however. Google doesn’t use categories, instead they use labels. Their themes are out of date. Their service is plagued with outages. However, for a basic blogging it’s okay.
If you have a hosting account you can use Blogger as your blogging software and have it publish your entries to your hosting account. This is a great option if you are using a free or premium hosting service and have a domain name connected to your hosting account already.

- WordPress.com – This service (offered by Automattic) like Google allows you to set up a blog in a very short amount of time. It too is free and hosted by them. You can upgrade your account on WordPress.com so that you can customize your blog’s CSS file. WordPress.com blogs offer users a lot of great features.
If you must go with a free hosted option then I would highly recommend WordPress.com over Blogger. I use the free, open source version of WordPress which you can install on your own server (more on that in a moment) and I absolutely love it. The interface on WordPress.com is exactly like the software you can download and install.
The major reason I would recommend WordPress.com over Blogger.com is the fact that if you decide to install WordPress on your own hosting account in the future, you can easily export your entries into a backup file and import them in your self-hosted installation very easily.
Note: You can import entries from a Blogger blog into a WordPress.com or self hosted WordPress blog. The only problem is that after you have imported your posts from Blogger you have to go through all of the posts and make sure that the formatting is how you want it. The way Blogger and WordPress display entries is different.
There are other free hosted blog solutions out there. The two that I have mentioned above are the ones I have used the most and are most comfortable in talking about their feature sets.
Other services that you might want to look into include: LiveJournal, TypePad, MovableType, MySpace or Twitter.
Self hosting benefits
If you want your own custom branded, custom designed blog then you’ll definitely want to look into self hosting your own blog. Most businesses would want to do this for branding reasons. This type of scenario would require you to install the blogging software or content management system onto your web server.
There are a lot of CMS packages out there. The one I’ll be discussing in great detail is WordPress CMS. I have been using it for quite a while now and am very happy with it. I started off using Nucleus CMS and was quite disappointed with it’s features. It left me begging for more. WordPress offered all the features I wanted right out of the box. It’s continued to get even better over the past couple of years.
The version of WordPress that you download and install onto your own server gives you all the functionality that WordPress.com blogs have while giving you the freedom to customize everything about your blog. You can install any plugin or theme you want. You can customize the themes to your heart’s content. You get free support from the WordPress.org Support Forums and it’s really good support, too. Once you start learning more about WordPress you can start helping out in the forums which will help the community grow and the software to get better.
Custom themes – WordPress.com offers a lot of themes that you can choose from. However, if you install WordPress onto your own server you can design your very own theme so that it looks exactly the way you want it to. Learn more about designing your own WordPress theme.
Movability – If you decide that you want to move your blog you can easily do so by backing up everything and moving it.
Branding – You can customize your website theme anyway you want. You can make it look like your current website by using the same styling and simply adding a few lines of PHP code.
Plugins – There are a ton of freely available plugins that you can install in your WordPress installation. The plugins allow you to easily extend your blog’s functionality.
Community Blogging – Want to set up your own blogging community, for free (hosting not included)? You can use the WordPress MU version and set up your own blogging community. Each member of the community can have their own blog. This is basically a free, open source version of WordPress.com
Other self hosted solutions: Joomla, Drupal, Movable Type, Nucleus.
Setting Up WordPress
The steps for installing WordPress are very similar to installing Nucleus CMS or any other content management system (CMS). Most CMS software comes in a ZIP file. You unzip the file, upload it and click the install button.
Requirements
- Web hosting – WordPress does not require a lot of space. The initial size is is roughly 3 megabytes. Remember, as you go you’ll probably be uploading pictures, possibly audio & video files. So keep that in mind.
- Database – Your web hosting account will need to provide you with a MySQL database. Keep in mind as your blog grows your database will grow too. Most hosting providers allow you to set up several. Set up one and write down the username and password.
- PHP – PHP is the scripting language that WordPress is built on. This must be available to you on your hosting account otherwise WordPress will not work.
- FTP Client – I prefer FileZilla FTP.
- Latest release of WordPress – Get WordPress here.
If for some reason you can’t get web hosting with the requirements above, don’t fret, you can still play with WordPress. It won’t be online but it will give you some experience. You can download XAMPP and install WordPress to a local installation. This is great if you’re new to this and don’t want to mess something up on your web hosting account.
Installation Instructions
- Extract the WordPress compressed file that you downloaded.
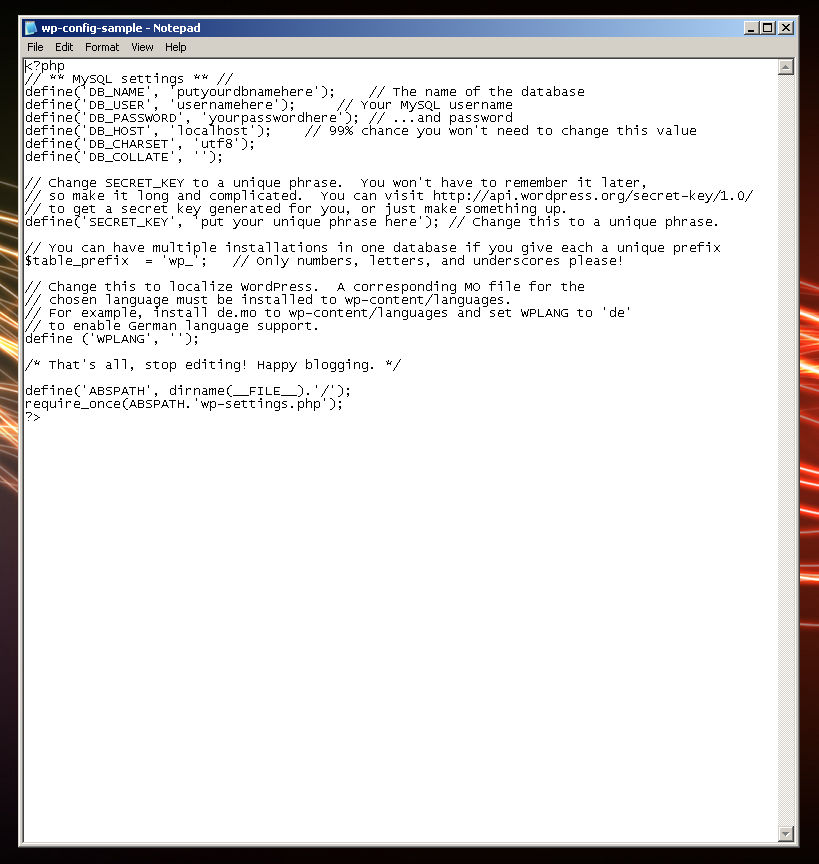
- Rename “wp-config-sample.php” to “wp-config.php”
- Open “wp-config.php” and enter the database name, username, password and the host location.
NOTE: WordPress says that you usually don’t have to change the server location, “localhost”. In my experience you usually do. Just check with your hosting provider or when you set up the database look to see what the location address of that database is. On GoDaddy it usually looks something like “servername123456.secureserver.net”
- Upload the WordPress files to your web server in the directory you would like to host your blog.
NOTE: If you upload into your root directory and have another website in the root directory, more than likely the WordPress blog will be the first thing that appears. If you do have something else on your hosting account then I’d suggest creating a new folder and uploading the WordPress files into that folder.
- Navigate to your domain, IP adress or folder on your server where you installed WordPress and you should get a page that gives you a link to install WordPress. Use that link to install WordPress. Once you do you can login and begin blogging. You should also receive an email with your username and password. If you don’t receive an email it means you’re hosting provider has disabled PHP emailing.
If the instructions above are not enough, look at the installation instructions on the WordPress website. There you will find much more detailed information.
Post Installation Instructions
Spam Prevention
SPAM! If you don’t have a way of preventing it, your blog will become full of spambots leaving comments or trackbacks on your blog posts. If you don’t prevent them it may become un-bearable to delete each spam entry. Luckily, with WordPress there is Akismet. Unfortunately, you’ll have to sign up for a WordPress.com account to get an API key to activate your copy of Akismet.
- Akismet Configuration – Login to your administration area, click on Plugins and activate Akismet.
- Get your API key – Even though you are hosting your own WordPress installation. Sign up for a WordPress.com account and retrieve your Akismet API key. Take the key and copy and paste it into your WordPress installation.
Two other plug-ins that I would highly recommend are Peter’s Custom Anti-Spam Image Plugin and Spam-Bam.
Spam-Bam keeps spammers from posting to your blog by limiting the speed at which they are capable of posting comments. Sometimes I’ll even get the “Slow down Cowboy” message if I’m posting comments too quickly on my own blog.
Peter’s Custom Anti-Spam Image Plugin requires commenters to enter the word or phrase in the captcha image. It’s not as cryptic as a lot of the captcha images out on the web. They’re quite clear. It’s one of the best captcha plugins I’ve seen.
With those two plugins and Akismet I have eliminated 99.9% of my SPAM comments and trackbacks. Depending on the popularity of your blog your success at eliminating SPAM with those plugins may vary.
Other plugins I recommend
- Dean’s Code Highlighter – I use this plugin here on TechButter when I want to display code on the blog without having to take a screen shot. So far, I’ve only used it once but think it’s a great plugin.
- Lightbox2 – If you’ve been looking through some of my older or newer articles you may have clicked on a screen shot or photo and been presented with a larger version. This plugin makes that happen. You have to write some HTML for each entry to make it work but it’s not that hard.
- Subscribe to Comments – I wish this plugin was built into the base install of WordPress. I love being able to click “Subscribe to comments via email” when I leave a post on other blogs. I read a lot of blogs and can never remember all of the ones I have commented on. I enjoy staying up-to-date on the discussion.
- Contact Form ][ – This plugin hasn’t been updated in over a year (as of the latest update to this article). However, it’s still my favorite plugin for contact forms. If you’re looking for a contact form with more options you might try cforms.
Permalinks
The purpose of a permalink is so that when someone wants to link to an article you wrote, they can link to the individual post instead of your entire blog. It makes it a lot simpler to get to the information.
The default installation of WordPress gives your entries a unique number in the address field of the browser.
Example: http://domain.tld/?p=147
For search engine optimization it is best to have something that is a little nicer looking, such as:
Example: http://domain.tld/2006/11/19/synergy/
How to set up permalinks:
- Create a blank text document (.txt extension)
- Upload this file to your fresh WordPress installation and make sure there is no file listed that says “.htaccess” You may have to instruct your FTP client to show ALL files to make sure it is or isn’t there.
- If the file isn’t there, upload your text file and rename it to “.htaccess” (without the quotes). Nothing before the “.”.
- Login to your WordPress administration area, go to Options and then choose Permalinks. Choose the permalink structure that looks best to you. I usually go with Date and Name based URLs.
- Go to your blog and select one of your posts. The title of your post will direct you to the permalink. If you can click on that link and load an individual post without errors then you have correctly configured permalinks. If not, check with the WordPress support forums.
Database Backup Plugins
To ensure that you’re website is backed up regularly you’ll want to get a WordPress plugin that you can install and do one click backups and then have WordPress email that backup to you. The backup plugins that I use are Il Filosofo’s WordPress Database Backup and WP-DBManager for more advanced backup options.
- Download the plugins
- Extract the plugins
- Upload to domain.tld/wordpressdirectory/wp-content/plugins
- Login to you administration area, go to Plugins and activate the two plugins you just uploaded.
- For the Il Filosofo database plugin go to Manage >> Backup. For the WP-DB-Manager plugin there should be a new tab at the top called Database.
- Get familiar with making a backup using each of the plugins. Also, set up a scheduled database backup. If you update often or get comments often you’ll want to backup daily.
Promote your blog
Tagging
With the latest version of WordPress you can insert tags into each of your posts. Whenever you make a new post onto your blog WordPress pings Pingomatic which tells syndication services that you have updated your blog. When anyone goes to a site like Technoratiand does a search for a tag that you gave one of your entries, your entry should show up in the results.
Blogrolling
If you read a blog that is along the lines of your blog, you might email the author and do a link exchange. They put your link on their blogroll and you put their link on yours. This will help somewhat in increasing traffic as well as help you to get acquainted with your fellow bloggers.
Link to stories on other blogs
Whenever you link to an entry on another person’s blog your blog will usually send out a trackback which will be placed in the comments section of the blog entry you linked to. That will tell the blog owner that you mentioned them in your latest entry.
Note: With statistics software it’s possible to see where traffic is coming from and you can tell if people are linking to your site and you can stay on top of the discussion.
Interface Suggestion
If you’re familiar with HTML then I would highly recommend that you turn off the default WYSIWYG editor that WordPress provides you with. For some reason I have a lot of trouble with it. I always change the editor from WYSIWYG to the HTML editor. I’m just much more comfortable with that style of editing and in my opinion it works a lot better. You can change this setting in your user profile.
Conclusion
Thanks so much for looking through my blog post about getting WordPress up and running. I truly hope this entry was helpful to you! If it wasn’t please let me know so I can update it and help you out even more. If there is a specific question you have about WordPress please ask me! Thanks again!
Article update: Thursday, September 12, 2008: I updated this article with new screen shots. I also updated this article with updated information regarding my suggested plugins.
Article update: Tuesday, October 21, 2008: Added links to contact form plugins.
by andymelton | Nov 14, 2006 | Software
A lot of people have been getting into video blogging lately. Rightly so because it is becoming much more popular. Once upon a time downloading a video on the Internet was atrocious because it took forever to download a 2 or 3 minute clip.
It was extremely annoying, however, today with much faster and lower cost Internet access, videos are becoming more popular, especially with video services like Google Video, YouTube, Vimeo and others. I have been asked how I produce my videos so I thought I would make a blog entry about it. Now, I have to make a disclaimer. The way I do it is probably different than the way everyone else does it. There are many ways to go about video blogging.
NOTE: Please see article update below to see the changes I have made to my video blogging process over the two years that this article has been online.
Recording Video
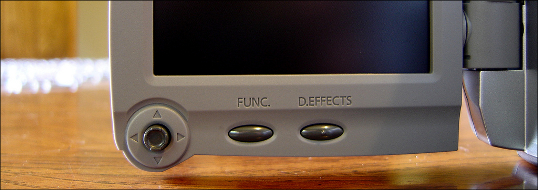
So what can you record with? Well, obviously you can record with a camcorder. What if you don’t have a camcorder? Do you have a digital camera? Do you have a webcam? Most new digital cameras record video and do a decent job of it. Most of them don’t offer zooming while you record a video and a lot of them are very poor in low light situations, however, if that’s all you have then make the most of it. When I record my videos I use my Sony Cybershot (DSC-P93A) digital camera. With it I can record as much video as I want as long as I have the storage for it on the memory card, so, the larger the memory card, the more video I can record. I’ve also recorded video using my old web cam (circa 2002). Regardless of which method you choose, there are many ways to record video so don’t let not having a fancy camcorder get in your way.
Importing Video
Luckily, for me, when I record videos on my Cybershot it is a really painless task to pull the videos from the camera. I simply hook up the camera, turn it on, navigate to the folder and drag and drop the files where I want them to be on my hard drive. If you’re recording with a web cam you’ll be saving directly to the hard drive which will make the next part of this process one less step away.
I have imported videos using a camcorder before, not using anything fancy like firewire though. A couple of years ago I purchased an ADS Tech Video Capture device that allows you to plug in an analog camcorder or any analog video source such as a VCR and pull video from that source and put it onto your computer. It is slow because you have to do it in real time (meaning you have to sit and watch as you record it to your hard drive). The capture device that I purchased came with easy-to-use software to record your videos. The only major problem with this technique is that the file size will be huge after you have recorded all of your footage onto the computer. Usually, for me, it is at least a couple of gigs.
Editing the masterpiece
Once you have all the footage onto your computer the next step is to piece everything together, add your effects, transitions, star wipes, etc. You can choose not to, it is obviously up to you, you are the artist. A lot of times I will simply put the videos together and then export it for lack of time and better software.
Speaking of software I should tell you what I use. I use a program called InterVideo WinDVD Creator. It came with my DVD burner and is more geared towards burning videos to DVD, however, it works for my purposes. I should say though that there is much better software out there, I simply use this because it came with my DVD burner.
Encoding
You’ll probably scream when I tell you this, but, I encode my videos twice. The first time I encode my video I am exporting the file out as an MPEG2 file using the highest quality setting so that there is not a lot of compression happening and the video exports a lot quicker. To encode the video the first time I am still using InterVideo WinDVD Creator.
Before you move on to the next step you might consider burning this file to a DVD for archiving purposes.
Once I get the video encoded the first time I am ready to compress it down into a much, much more reasonable file size. For this I use a program called Videora iPod Converter. It converts the video file down really nicely without taking away too much quality. It also has a one-click transcode feature which is really nice and easy. You simply tell it where the file is and hit the button and it spits out a nice MP4 file. Now, some people may throw up their arms and say “BUT WAIT A MINUTE, I don’t have an iPod to play iPod videos!” Don’t worry, I don’t have an iPod either and I use a program called VLC Media Player to play the video files and iTunes will also play them which is what most people use to subscribe to podcasts (unless they’re like me and use Podnova, but, I digress). So, don’t worry! A lot of people use to fuss about file formats however Linux, Mac OS and Windows are all capable of playing the same file formats (with the proper software).
Publishing – Where to host the file
OK! You’ve got your video recorded, imported, edited and encoded! Now, you need to get it published which means you’re first going to have to have a place to put the file online.
There are several resources available to you. If you want to pay for web hosting you can purchase some web hosting at GoDaddy or another hosting company.
The second option is a free option. You can upload your videos to PodShow and use their network to host your videos. Currently, they are doing the same thing with audio and only adding an ad to the beginning of the show. In my opinion this is acceptable because you are getting free hosting. Currently, to my knowledge they are not placing ads on videos that you upload to the network. If you’re strapped for cash then the free option from PodShow is a great service. Also, take this into consideration, you’ve got a REALLY good service like PodShow worrying about all the bandwidth. You don’t have any limits like you would with your web site hosting company. In my opinion I think it is a win-win situation. Now, if you’re still not comfortable with them placing ads onto your content there is a second option and it is free as well.
You can set up an account on archive.org and upload your videos there. Now, I have used archive.org and it is a great service and I really like what they’re doing (archiving everything, hence the name), but, IT IS SLOW!
The last option that I know of for hosting your video is to use a service such as YouTube, Vimeo or one of the other online video publishing services. Most of them are free and allow you to upload whatever you like as long as it is not copyrighted. With these services you also have to be careful about nudity and language because there are a lot of people who get offended very easily who traverse these websites.
So keep those in mind as you are looking for a place to host your file.
Publishing – Uploading the file
Now that you’ve decided on a location for the file, how are you going to get it there? Well, if you’re using either the PodShow, Archive.org or “YouTube like service” option then you will upload your content using their transfer utility on their website. If you purchased web hosting somewhere then you’ll need to FTP your video up using an FTP client such as FileZilla.
Publishing – Blogging
Now that you’ve got all that work done, there is even more! Don’t worry, there is only one more step after this one! If you’ve got a blog you’ll definitely want to make a post about it, otherwise, how would people know about it? So, what you’ll do or I should say, what I do is I go and make a post as normal and then I simply link to the video file. Sometimes I will take a screen capture of the video at an interesting part of the video and upload the image to my blogging software and link the image to the video file. To take a screen capture of a video I again use VLC Media Player, which, on Windows, saves the picture to the “My Pictures” folder by default.
Publishing – RSS Feed
Now you need a way for your subscribers to subscribe to your content so that they can plug it into iTunes, Podnova or whichever podcatcher that they use. You’ll need some software to do this. If you’re on Windows you can download free software called FeedSpring which is what I use for my audio & video journal. If you’re on Linux you can use FeedSpring as well you’ll just have to use it through Wine emulation. If you’re on the Mac you can check out my friend Steve’s software called Feeder which allows you to create RSS feeds on the Mac.
If you are uploading your videos to a service like Podshow, archive.org or your own hosting account, use the software I mentioned above to create a link to the file once it is uploaded. If you are hosting the video on a service like Vimeo, you can still create an RSS feed that will take users to the page that you are showing the video on.
Once you’ve got your feed created the next step that I would highly recommend to everyone is adding it to FeedBurner. The reason I say to put your feed on FeedBurner is so you can much more easily submit your feed to services such as iTunes. Also, the most important reason for using FeedBurner is because you can easily change the location of your feed. Lets say you have your feed in a directory on your server called “blog” and you decide later on you want to move it to another folder called “feed” you can do so and then you can simply update the address in your FeedBurner account, that way, your users won’t have to re-subscribe to anything.
FeedBurner will also give you statistics for your feed, however, don’t count on them too much, at least, that is how I feel about them. The counter always seems a little inflated. To get a true look at the people who have downloaded your video you need to look at the statistics for your website, not the RSS feed. Robots brushing up against your feed will cause your numbers to rise.
Publishing – Statistics
Now that you’ve got the video online you’ll probably want to know how many people are downloading and watching your content.
If you purchased web hosting you should be able to log in to a statistics area for your website and track the total number of downloads for your file. Most services offer this as a free package. Some don’t so you’ll have to check with your hosting provider.
If you uploaded to a service like PodShow, Archive.org, or a YouTube like service then most of those services will display a “viewed” number.
In Conclusion
Finally, I want to leave you with a web link to a blog that talks about how to get the most out of your recording experience.
8 Ways To Shoot Video Like a Pro (from Lifehacker)
I hope this entry has helped you! If it has, let me know. If it hasn’t, let me know and tell me how I could make it better. If you have any questions you’d like answered on this blog feel free to contact me! Thanks for reading!
Article update: Wednesday, December 17, 2008: It has been a couple of years since I have published this article so I have changed the way I record and publish my videos. Not a whole lot but I think it’s worthy of updating this entry to reflect the changes.
The first change that I have made is that I am now recording with a DV (Digital Video) camcorder (a Canon ZR800) in addition to my Sony Cybershot DSC-P93A. The camcorder records video at a much higher resolution and I have more options for recording. Importing video is more time consuming than dragging and dropping a file from a memory card. To pull video from the DV camera you have to pull it off in real time, meaning you have to watch it as it comes into the computer. DV video also takes up a lot more hard drive space. One DV video cassette takes up 20 GB of hard drive space.
The second change that I have made is that I am now using different software for editing and encoding. I am now using Sony Vegas Movie Studio Platinum edition for editing. It’s really great software but it’s not free. For encoding my videos to iPod format I am now using MPEG Streamclip, which is free.
The only other change that I have made is the way I publish videos to my RSS feed. I am no longer using FeedSpring and am now using Reinvented Software’s Feeder, which is a great way to publish enclosures to an RSS feed. I highly recommend it.
by andymelton | Oct 14, 2006 | Software
I am wanting to convert my blogs that are running on Nucleus CMS to WordPress, there are several reasons why and first of all, I want to explain why and then I will tell you how to do this:
The first and major reason I am wanting to switch is because I do not feel as though my blogs are getting enough visitors. One reason I feel this is happening is because when a search engine spiders my blogs they are not able to index my posts. From my understanding this has to do with the URL scheme for permalinks that Nucleus uses, it’s too complicated. In the Nucleus CMS forums there are tutorials for how to change the way articles are linked, however, I have been completely un-sucessful with them.
There are more features in WordPress than in Nucleus and I am wanting them now, I don't want to have to wait on future versions. The development of Nucleus seems to have slowed down, tremendously. Features I am wanting that WordPress has out-of-the box right now:
- Static pages
- Password protection
- Multiple categories
- Better SPAM prevention
- Easier blog-rolling or linking.
- Dashboard that shows you news in the WordPress community as well as notifications when someone links to your site.
When you upload images using Nucleus CMS it creates a proprietary link instead of linking to the image. This is especially annoying for me because when I do convert to WordPress, I am going to have to update each post so that the images will actually work!
There are other reasons that I don't like Nucleus CMS. There are reasons why I like it. However, I seriously believe it is time for me to make the switch to WordPress CMS. If nothing else, just so I can get more visitors coming to this website! At least, I hope that will happen! So, here is how we do this!
- Backup your Nucleus CMS database! If something goes wrong, you might have problems accessing your site.
- Install fresh copy of WordPress 1.5. This is an older version of WordPress, however, the converter that we are going to use does not like the newer version of WordPress. Once we get the Nucleus CMS database imported into WordPress 1.5 we can upgrade to the latest version (currently 2.04).
WordPress Archive Directory
WordPress Version 1.5 (ZIP)
- Download the converter that we are going to use and then upload into a directory on your web server. Nucleus ConverterYou can see the original documentation for the converter here.
- Make sure you have available the username and password of both your Nucleus & WordPress databases. Also, make sure that your Nucleus database doesn't have a prefix. If it does, you'll need to write down what the prefix of the database is.
- Navigate to the converter script that you uploaded to your site.
- Plug in the fields and click on convert.
Your posts should now be converted into WordPress, at least, this worked for me. Now, make sure you upgrade to the latest version of WordPress and then you can start cleaning up your WordPress blog. Unfortunately, you'll have to edit individual posts and re-link your images.
If you have uploaded images to your nucleus installation you can download them from the media directory, my images were under “nucleus/media/1”. I plan to upload the images to another directory and then re-link each one. If there is a simpler solution that I come up with, I will update this post.
I had multiple blogs on my Nucleus installation and what I am planning to do is to turn each of those blogs into its own category in the new WordPress installation. I need to move a couple of blogs into their own installation. I'm hoping I can either come up with a way to export individual blogs or once they are converted, export into a new install and delete the posts I don't want. If anyone has a simple way to do this, please, let me know!
Also, I should note that when I did this I also installed a fresh copy of Nuclues onto my local server, just in case something went horribly wrong.
