Purpose
These steps will guide you through the process of scheduling audio capture via line-in on a Linux-based computer.
Pre-Requisites
The following equipment and software will be used for this tutorial:
-
- Raspberry Pi 3 Model A Plus Rev 1.0
- USB Audio Adapter from Adafruit
- Raspbian 11 (Bullseye)
- 64 GB MicroSD Card
- NOTES:
- A larger MicroSD card should be used if you don’t plan to offload the audio files daily.
- While out of scope for this tutorial, recording to an alternate storage location would be ideal to reduce writes to the MicroSD card.
- NOTES:
Software
It is assumed that the following is already configured/installed:
-
- Raspbian has already been set up on the Raspberry Pi.
- If not, refer to Getting started with your Raspberry Pi.
- A user account that will be used for the recording task has been created.
- The following (non-standard) software packages have been installed:
- arecord
- ffmpeg
- You have access to the Raspberry Pi desktop or can retrieve the recorded WAV files via SFTP for confirmation of playability.
- Line in cable is connected to the USB Audio Adapter and is supplying audio to be captured.
Create Directories
From the recording user’s home directory, creating the following directory structure:
-
- recordings
- active
- transfer
- scripts
- recordings
Steps to Test Audio Capture
We will need to identify the capabilities of the USB Audio Adapter.
1.) Connect the USB Audio Adapter to the Raspberry Pi.
2.) Enter the following command into the terminal to identify the capabilities of the USB Audio Adapter:
arecord -D hw:1,0 --dump-hw-paramsYou should see output like the following:
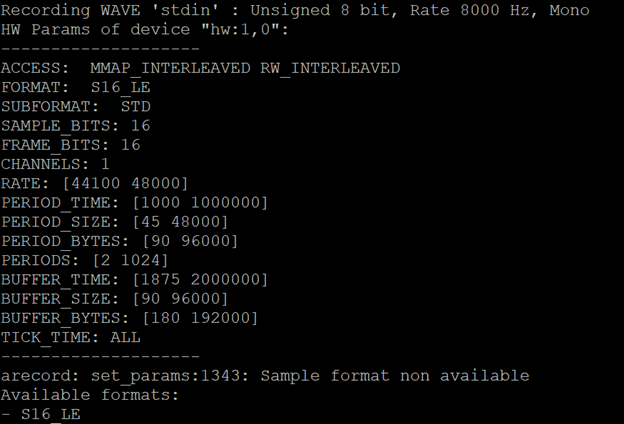
Take note of the device name (e.g., hw:1,0).
The CHANNELS field lets us know that we only have 1 audio channel available for recording (i.e., mono only vice stereo).
3.) Issue the following command into the terminal to record a 10 second audio file using arecord.
arecord -D hw:1,0 -f S16_LE -r 44100 -c 1 -d 10 test.wavYou should see output like the following:
![]()
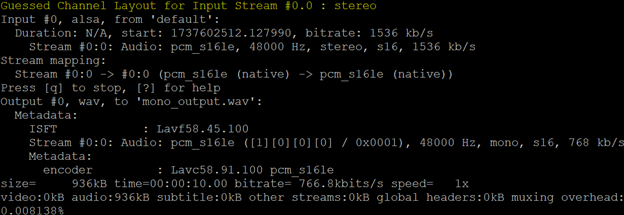
4.) Assuming a successful recording using arecord, issue the following command into the terminal to record a 10 second audio file using ffmpeg.
ffmpeg -f alsa -i default -ac 1 -t 10 test.wavYou should see output like the following:
5.) Assuming a successful recording, proceed to Creating a Bash Script for Recording.
Steps to Create a Bash Script for Recording
1.) Navigate to the /home/username/scripts directory.
2.) Create a new shell script using nano. Issue the following command:
nano record-audio.sh3.) In the blank text editor, copy/paste the following script:
#!/bin/bash
TIMESTAMP=$(date +"%Y-%m-%d_%H-%M-%S")
/usr/bin/ffmpeg -f alsa -i plughw:CARD=Set,DEV=0 -ac 1 -t 3300 $HOME/recordings/active/audio_$TIMESTAMP.wav
mv $HOME/recordings/active/audio_$TIMESTAMP.wav $HOME/recordings/transfer
This script:
- Defines the timestamp that will be applied to the output file.
- Tells ffmpeg to record audio on DEV=0 for 55 minutes (3300 seconds).
- Adjust for your device.
- You may want to adjust this to 10 seconds for initial testing.
- Indicates where the file should be saved and the name that should be applied to the file.
- Files actively being recorded are placed into the active directory.
- Completed files are moved into the transfer directory. Transfer meaning the file is completed and ready to be transferred for processing.
- $HOME indicates the home directory of the user running the script.
- Adjust to your project’s needs.
4.) Use Ctrl + X to close the file. When prompted, save the file.
5.) Make the script executable by issuing the following command:
chmod +x ~/scripts/record-audio.sh6.) Attempt to run the script manually. From the scripts directory, issue the following command:
./record-audio.shIf confirmed to run successfully, press Ctrl + C to end the recording. Proceed to Use CRON to Schedule 24×7 Recording.
Steps to Configure a CRON Job for 24x7 Recording
1.) Issue the following command to launch the CRON job editor.
crontab -e2.) Add the following command to the bottom of the file:
0 * * * * $HOME/scripts/record-audio.shNOTE: If you would like to have a log generated you can use the following instead. Just note that the log file can grow substantially as time progresses. Make sure to clean it out or stop outputting a log when no longer needed.
0 * * * * $HOME/scripts/record-audio.sh >> $HOME/logs/record_audio.log 2>&1Some examples of other recording times:
| 0 9 * * * | To record every day at 9 AM. |
| */15 * * * * | To record every 15 minutes. |
Additional Useful Commands
| grep CRON /var/log/syslog | Confirm the CRON job is running. |
| tail -f /var/log/syslog | grep CRON | Use tail (not installed by default) to monitor the output syslog continuously. |
| tail -f /var/log/syslog | grep –color=always CRON | Apply color to the output of tail. |