Introduction
 I love remote computing! Over the years I have established thousands of SSH, VNC, and RDP sessions to various computers and servers. The problem I often run into is needing to re-establish those connections if I switch to another workstation or if I re-install the host operating system on the workstation I’m connecting from. I’ve employed workarounds such as using file shares or cloud storage to store connection files. That solution works to a point but is not without its own problems. Then there is the issue of connecting from a mobile device! Good remote computing apps come and go. Their ability to work with the same connection files stored in file shares or cloud storage is hit or miss. There must be a better solution?
Of course there is! One of the best free and open source solutions available today is called Apache Guacamole. Guacamole is a remote desktop gateway server that serves various remote computing protocols via a web browser. Once installed, you navigate to the Guacamole server via any HTML 5 capable web browser, login, then select the system you want to connect to. Assuming the supplied credentials are correct you are then logged into the remote system via the web. Any device that has an HTML 5 capable web browser is now a computer terminal! Your TV, phone, tablet, a spare computer, etc.! Think of the possibilities!
 These instructions were written primarily to document how I setup my own Guacamole server. That way if I have to rebuild my server or setup another one I will remember how I did it! While I wrote these for my setup, I have attempted to write them for someone who has not setup a Guacamole server before. Just keep in mind that what worked for me may not work for you!
Pre-Requisites
These instructions were written using a base install (including installation of “SSH server” and “standard system utilities” during installation) of Debian 11 “Bulls Eye” (64-bit) running in a Hyper-V virtual machine.
You will need the PuTTy Key Generator installed in order to complete the actions outlined in Step 2 – Require Token Based Authentication for Debian user Accounts.
Expected Outcome
In the end you will have an Apache Guacamole server that:
- Has a MariaDB database backend for user and connection management.
- Is secured via two-factor authentication (when accessing via a browser and SSH).
- Has an SSL certificate so that web browsers will not mark the site as “Not Secure”.
- You can skip this step. However, if you plan to utilize one of your connections in full-screen mode, most browsers will pin the address bar to the top of the screen so that you know the connection is not secure.
- Is accessible remotely via a NO-IP hostname.
References
These instructions were written by using the resources below:
- Apache Guacamole User Guide (GUG).
- Debian Wiki for Guacamole
- Working with MySQL-MariaDB Time Zones
- StuffAboutCode.com’s article for running a program at start-up on the Raspberry Pi. This works here since the Raspberry Pi OS is based on Debian.
- Tony Teaches Tech’s video titled How to Install a Free SSL Certificate with Let’s Encrypt (on Nginx and Apache websites).
- Sebastian Mogilowski’s Blog article titled Two Factor Authentication with Guacamole 1.1.0 Part 4.
- Previous AndyMelton.net blog articles.
Step 1 - Install Required Packages Available in Debian Repositories
Thankfully, many of the packages that we will need to setup Apache Guacamole can be easily installed from the Debian software repositories. There are a few that we will need to manually download and install. We’ll take advantage of the Debian repositories as much as possible!
Use the following apt-get install command to install the packages available in the Debian software repositories:
apt-get install apache2 certbot default-jdk freerdp2-dev gcc guacd libavcodec-dev libavformat-dev libavutil-dev libguac-client-telnet0 libguac-dev libmariadb-java libossp-uuid-dev libpango1.0-dev libpulse-dev libssh2-1-dev libssl-dev libswscale-dev libtelnet-dev libvncserver-dev libvorbis-dev libwebp-dev libwebsockets-dev make mariadb-server python3-certbot python3-certbot-apache software-properties-common tomcat9 tzdata ufw wget -y
For more detailed information about the required and optional packages refer to the Apache Guacamole Manual.
- apache2
- We will be installing Apache web server so that we can take advantage of its easy to configure reverse proxy feature. This will allow us to redirect requests from the web to Tomcat. I.E. This will allow us to very easily serve our Apache Guacamole instance to the web.
- certbot, python3-certbot, and python3-certbot-apache.
- These packages will be used to configure an SSL certficate for our server.
- default-jdk
- Java Development Kit needed by many of the scripts that run Guacamole
- freerdp2-dev
- Required for establishing RDP sessions. RDP is the primary method for establishing a remote desktop session to a computer running Microsoft Windows.
- gcc
- GNU Compiler Collection is needed for compiling the packages for Guacamole.
- guacd
- guacd is the Guacamole daemon. Since Debian has a version in the repositories we will use it rather than compile from source.
- libavcodec-dev, libavformat-dev, libavutil-dev, and libswscale-dev
- Used by FFmpeg to encode recordings of Guacamole sessions.
- libtelnet-dev and libguac-client-telnet0
- Required for Telnet support.
- libguac-dev
- Guacamole developmental libraries.
- libmariadb-java
- Necessary drivers and connection scripts to allow Java-based applications to connect to a MariaDB database.
- libossp-uuid-dev
- Responsible for assigning a unique ID to each connection established.
- libpango1.0-dev and libssh2-1-dev
- Required for SSH support.
- libpulse-dev
- Required for experimental VNC audio support.
- libssl-dev
- Required for establishing a secure connection using SSL and TLS.
- libvncserver-dev
- Required for VNC support.
- libvorbis-dev
- If installed, Guacamole will utilize Ogg Vorbis for audio compression. If not installed, Guacamole will fall back to WAV.
- libwebp-dev
- Used by Guacamole for writing WebP images.
- libwebsockets-dev
- Required for Kubernetes support.
- make
- We will be utilizing make to compile packages once extracted from their archives.
- mariadb-server and mariadb-client
- MariaDB server is a fork of MySQL. This will allow us to have web-based user administration and connection management.
- Without this we’d have to configure users and connections using configuration files.
- You will see references to mariadb and mysql. The commands are not always interchangeable.
- The MariaDB client will allow us to create and manage our Guacamole database via the terminal.
- software-properties-common
- Allows us to more easily manage packages.
- tomcat9
- Tomcat9 is the engine that drives the Apache Guacamole web application. Many sources refer to Tomcat9 as the “servlet.”
- tzdata
- We will need the time zone data to properly configure our MariaDB server’s time zone.
- ufw
- We will use The Uncomplicated Firewall to easily manage the Linux firewall.
- wget
- We will be utilizing wget to download package files onto our server.
Step 2 - Require Token Based Authentication for Debian User Accounts
To enhance the security of our server we are going to require that our standard user accounts that are connecting to the server via SSH must possess and provide a private key in addition to their password. We will not be making this change to our root account (by default root is not allowed to logon via SSH).
For the steps below we will be utilizing a component of the Windows version of PuTTy called PuTTY Key Generator.

During the installation of PuTTY, PuTTY Key Generator should have also been installed. On Windows, it should be on the Start Menu. You might have to search for “puttygen” (without quotes).

If you can’t find it on the Start Menu it should be located at C:\Program Files (x86)\PuTTY\puttygen.exe
Once you have found and opened PuTTy Key Generator, from the main screen in the Actions section, click on Generate.
You will see an instruction at the top to move your mouse cursor over the blank space.

Once a key has been generated you will see the new public key, a fingerprint and comment. Add a key passphrase and store it in your password manager.
Copy and paste the public key.

Store the public key in a secure area. Yes, there is an option for “Save public key” but it adds additional white space that we don’t need. Copying and pasting the key from the field at the top of the window saves us the trouble of having to clean up the added white space later.
Do go ahead and save your private key using the “Save private key” option.

Return to your SSH session. If you are in the super user (su) environment, exit out of it and return to your standard user account. The next few commands need to be issued as our standard user.
Create a directory named .ssh in your standard user home directory. The command below will create a hidden directory named .ssh
mkdir /home/username/.ssh
We now need to get the public key that we copied from PuTTY Key Generator into the newly created folder, in a file named authorized_keys.
Change into the .ssh directory.
cd .ssh
Create the authorized_keys file:
touch authorized_keys
Open the authorized_keys file using Pico.
pico authorized_keys
Paste the public key into the authorized_keys file, then save and exit the file using Ctrl + X.
We now need to change the permissions of the authorized_keys file using chmod.
chmod 644 authorized_keys
Switch back into the “super user” environment. Enter your root password when prompted.
su
We now need to edit the sshd_config file located at /etc/ssh/sshd_config:
pico /etc/ssh/sshd_config
In the sshd_config file, change the following options to NO:
PasswordAuthentication
PermitEmptyPasswords
ChallengeResponseAuthentication
UsePAM
Once you have changed those options to No, save and exit the file using Ctrl + X.
Restart the SSH server:
systemctl restart ssh
We now need to go back into PuTTY and modify our connection.
Click on the connection within PuTTY and select Load.
From the Category sidebar, expand SSH and select Auth. At the bottom of the list of options you will see Private key file for authentication. Click on Browse and select your private key file.
Return to the Session options screen. Click on Save to save the new authentication method.
Upon re-connecting to the server, you will be prompted for the user that you would like to logon as and the passphrase for that user’s private key.
These changes only affect how you logon to your standard user account via SSH. Once logged into the server via SSH, as you are performing administration tasks and are prompted for your password, you will still supply the actual account password. If you have multiple user accounts, you will need to generate public and private keys for those accounts.
Step 3 - Configure the System Firewall using UFW (Uncomplicated Firewall)
UFW resides in the /usr/sbin directory.
In this section we will open ports 22 for SSH, 8080 for the Tomcat server, and 443 for when we go through the process of securing our server with an SSL certificate.
You can see a full list of commands for ufw by issuing the command /usr/sbin/ufw –help

The commands below will allow 22 for SSH, 8080 for the Tomcat server, 80 for HTTP, and 443 for when we configure an SSL certificate later. Issue the commands below in the super user environment.
/usr/sbin/ufw allow 22
/usr/sbin/ufw allow 8080
/usr/sbin/ufw allow 80
/usr/sbin/ufw allow 443
The following command will enable the firewall. Issue it after allowing the necessary ports above.
/usr/sbin/ufw enable
The following command will reload the firewall tables. Issue it after enabling the firewall.
/usr/sbin/ufw reload
The following command will show us a list of the rules added.
/usr/sbin/ufw status
If at any time you need to remove a rule, use the following command to get a numbered list.
/usr/sbin/ufw status numbered
Then use the delete command along with the applicable rule number.
/usr/sbin/ufw delete RULENUMBERHERE
Before proceeding it is a good idea to restart the server and reconnect using SSH to ensure the firewall was configured correctly.
Step 4 - Secure MariaDB
mysql_secure_installationYou will first be prompted to enter a root password for MariaDB (this is not for the system’s root account).

For a more secure system you should not use the same password for your MariaDB root user as your localhost root user.
When prompted to “Switch to unix_socket authentication” enter n for No.
![]()
When prompted to “Change the root password” enter n for No (since this was done in a previous step).

You can enter y to re-enter the root password if you feel you incorrectly entered the root password in the previous step.
When prompted to “Remove anonymous users?” enter y for Yes.

When prompted to “Disallow root login remotely?” enter y for Yes.

When prompted to “Remove test database and access to it?” enter y for Yes.

When prompted to “Reload privilege tables now?” enter y for Yes. This will complete the MariaDB security configuration.

Step 5 - Set the MariaDB Time Zone
Convert time zone data into a format that MariaDB will understand using the mysql_tzinfo_to_sql command.
mysql_tzinfo_to_sql /usr/share/zoneinfo/ > ~/zoneinfo.sql
You will most likely receive an error indicating that leap-seconds.list, leapseconds, and tzdata.zi could not be loaded as a time zone and were skipped.

Import the generated zoneinfo.sql file into MariaDB. Enter your MariaDB root user password when prompted.
cat ~/zoneinfo.sql | mysql -u root mysql -p
Directly connect into MariaDB using the MariaDB console client. Enter your MariaDB root user password when prompted.
mariadb -u root -p
View the list of available time zones and notate the applicable time zone for your area.
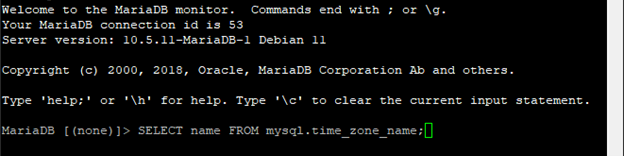
SELECT name FROM mysql.time_zone_name;

If you cannot find the applicable time zone, try narrowing the results by searching for your region.

SELECT name FROM mysql.time_zone_name WHERE name LIKE '%YOURREGIONHERE%';
Example: Replace %YOURREGIONHERE% with %America% to see North & South America time zones.
Exit the MariaDB console.
quit
Open the mariadb.cnf file located in /etc/mysql
pico /etc/mysql/mariadb.cnf
Add the line below at the bottom then save and close the file. Replace YOURTIMEZONEHERE with your timezone. Example: America/Los_Angeles
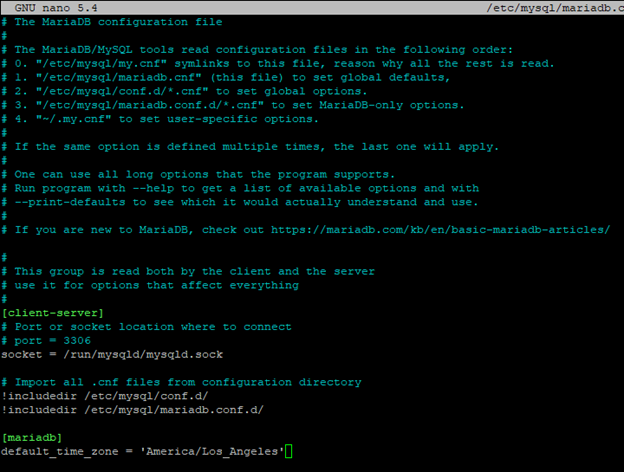
[mariadb]default_time_zone = 'YOURTIMEZONEHERE'
Restart MariaDB then confirm it is running again by checking its status.
systemctl restart mariadb
systemctl status mariadb
When ready, press the letter qto exit the status monitor.

Once you have confirmed that MariaDB is running again, log back into the MariaDB console with your root account.
mariadb -u root -p
Confirm the time zone has been updated.
SELECT @@time_zone;
If the time zone is not updating:
- Confirm that the time zone is an actual time zone.
- Check the spelling.
- Ensure you are wrapping your time zone in double quote marks.
- Logout of MariaDB and back in, re-issue the SET GLOBAL time_zone command.
Step 6 - Create the guacamole_db Database & guacamole_user Database User Account
Create a database named guacamole_db.
CREATE DATABASE guacamole_db;
- guacamole_db is the default database name suggested in the Guacamole documentation. You can use a different name, if preferred. If you do, remember to update any configuration files that require the Guacamole database.
- If you make a mistake in the creation of your database, you can delete the database and try again using the DROP command.
DROP DATABASE guacamole_db;
If you have exited out of MariaDB and need to confirm that you entered the database name correctly you can use the SHOW DATABASES command.
SHOW DATABASES;
Create a user named guacamole_user which will be used to administer the guacamole_db database. Replace YOURPASSWORDHERE with a password of your choosing. The password should be between single quote marks.
CREATE USER 'guacamole_user'@'localhost' IDENTIFIED BY 'YOURPASSWORDHERE';
- guacamole_user is the default username suggested in the Guacamole documentation. You can use a different username if preferred. If you do, remember to update any configuration files that require the user account allowed to administer the guacamole_db database.
- Remember to wrap the username, host, and password fields with single quote marks ( ‘ ‘ ).
- If you make a mistake and create an account with the wrong username or password you can easily drop the account and make a new one:
DROP USER 'APPLICABLEUSERNAMEHERE'@'localhost';
If you have exited out of the MariaDB console you can show the list of users by re-accessing the MariaDB console and issuing the following commands:

SHOW DATABASES;
USE mysql;
SELECT user FROM user;
Grant the guacamole_user permissions to the Guacamole database.
GRANT SELECT,INSERT,UPDATE,DELETE ON guacamole_db.* TO 'guacamole_user'@'localhost';
Issue the FLUSH PRIVILEGES command (to allow the permissions to take effect immediately) and exit the MariaDB console.

FLUSH PRIVILEGES;
quit;
Step 7 - Create Directories for Guacamole Configuration Files
Make a new directory in /etc named “guacamole” and add two subdirectories, “extensions” and “lib.”
mkdir /etc/guacamole
mkdir /etc/guacamole/extensions
mkdir /etc/guacamole/lib
Step 8 - Download Required JAR Files
mysql-connector-java-8.0.13.jar
Change into the /etc/guacamole/lib directory then download the MySQL Java Connector (MariaDB version unavailable at time of writing).
cd /etc/guacamole/lib
wget https://dev.mysql.com/get/Downloads/Connector-J/mysql-connector-java-8.0.13.tar.gz
Once wget completes, perform the following steps:
Extract the contents of the mysql-connector-java-8.0.13.tar.gz using the tar command.
tar -xzvf mysql-connector-java-8.0.13.tar.gz
Change into the newly created directory using the cd command.
cd mysql-connector-java-8.0.13
Copy the mysql-connector-java-8.0.13.jar file to /etc/guacamole/lib directory.
cp mysql-connector-java-8.0.13.jar /etc/guacamole/lib
guacamole-auth-jdbc-1.3.0.jar
Change into the /etc/guacamole/extensions directory then download the Guacamole JDBC authentication component using wget.
cd /etc/guacamole/extensions
wget -c https://dlcdn.apache.org/guacamole/1.3.0/binary/guacamole-auth-jdbc-1.3.0.tar.gz
Once wget completes, perform the following steps:
Extract the contents of the guacamole-auth-jdbc-1.3.0.tar.gz using the tar command.
tar -xzvf guacamole-auth-jdbc-1.3.0.tar.gz
Change into the newly created directory using the cd command.
cd guacamole-auth-jdbc-1.3.0
Change into the mysql directory.
cd mysql
Copy the guacamole-auth-jdbc-mysql-1.3.0.jar file to /etc/guacamole/extensions
cp guacamole-auth-jdbc-mysql-1.3.0.jar /etc/guacamole/extensions
Step 9 - Populate the guacamole_db Database with Default Authentication Information
Change into the /etc/guacamole/extensions/guacamole-auth-jdbc-1.3.0/mysql/schema directory and populate the Guacamole MariaDB database with the default authentication data. Enter your MariaDB root user password when prompted.
cd /etc/guacamole/extensions/guacamole-auth-jdbc-1.3.0/mysql/schema
cat *.sql | mariadb -u root -p guacamole_db
Step 10 - Create guacamole.properties
Create the guacamole.properties file that will tell the guacd daemon the server’s hostname, the port to listen on, and the MariaDB server information.
touch /etc/guacamole/guacamole.properties
Open the guacamole.properties using pico.
pico /etc/guacamole/guacamole.properties
Add the following to the contents of the guacamole.properties file. Save (Ctrl + X) when finished.
# Auth provider class

			auth-provider: net.sourceforge.guacamole.net.auth.mysql.MySQLAuthenticationProvider

		# Hostname and port of guacamole proxy

			guacd-hostname: localhost

			guacd-port:     4822

		# mariadb properties

			mysql-hostname: localhost

			mysql-port: 3306

			mysql-database: guacamole_db

			mysql-username: guacamole_user

			mysql-password: yourpasswordhere
Replace guacamole_db, guacamole_user, and yourpasswordhere with the applicable username and password you created in previous steps.
Step 11 - Define the $GUACAMOLE_HOME Environment Variable
Define the $GUACAMOLE_HOME environment variable to indicate where the libraries, extensions, and configuration (conf) files for Guacamole will be stored. These are generally stored in /etc/guacamole.
sh -c "echo 'GUACAMOLE_HOME=/etc/guacamole' >> /etc/default/tomcat9"
Step 12 - Link the guacamole.properties File to the Tomcat9 Installation
Link the guacamole.properties file to the Tomcat9 lib directory. This is necessary so that Tomcat can easily access and read the guacamole.properties file.
ln -s /etc/guacamole/* /var/lib/tomcat9/lib/
Step 13 - Download Apache Maven
We will now download Apache Maven so that in the next step we can download and compile the Guacamole Client. The Guacamole Client is the front-end application that we will be accessing with our web browser once Guacamole is up and running.
Change back into your home directory
cd /home/yourusername
Download Apache Maven (current package is apache-maven-3.8.2-bin.tar.gz) using wget.
wget https://archive.apache.org/dist/maven/maven-3/3.8.2/binaries/apache-maven-3.8.2-bin.tar.gz
Extract the contents of the apache-maven-3.8.2-bin.tar.gz package and change into the newly created directory.
tar -xzf apache-maven-3.8.2-bin.tar.gz
cd apache-maven-3.8.2
Add a new PATH variable to the bin directory inside of the newly created apache-maven-3.8.2 directory. This will allow the usage of the mvn command. This modification to the PATH variables is temporary to this session.
export PATH=$PATH:/home/YOURUSERNAME/apache-maven-3.8.2/bin
The JAVA_HOME path also needs to be set for commands to be issued in later steps. We know this needs to be set by issuing echo $JAVA_HOME and seeing no entries. This modification is also only temporary to this session.
export JAVA_HOME=/usr/lib/jvm/java-1.11.0-openjdk-amd64
Execute mvn -v to confirm the mvn command works. Results as shown below indicate Apache Maven is ready for use.

mvn -v
Change back into your home directory
cd /home/yourusername
Step 14 - Download and Compile guacamole-client using Apache Maven
As stated in the previous step, The Guacamole Client is the front-end application that we will be accessing with our web browser once Guacamole is up and running. We will use Apache Maven to compile the application.
Download the guacamole-client package (current package is guacamole-client-1.3.0.tar.gz). Use wget to download the file. Ensure you are in the directory you want to download the file to.
wget https://dlcdn.apache.org/guacamole/1.3.0/source/guacamole-client-1.3.0.tar.gz
Extract the contents of the guacamole-client package and change into the newly created directory.
tar -xzf guacamole-client-1.3.0.tar.gz
cd guacamole-client-1.3.0
Use the mvn package command to build guacamole-client.
mvn package
SUCCESS results should appear when completed.
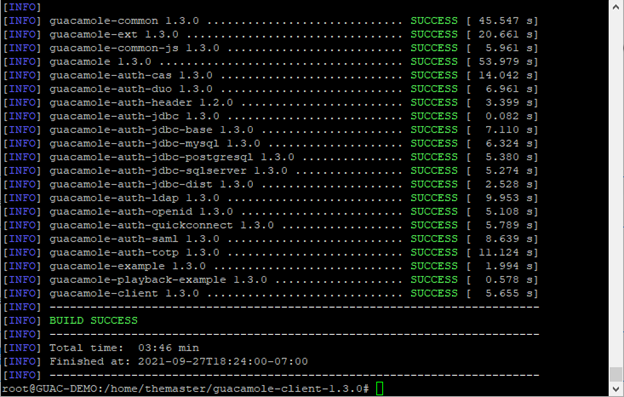
The mvn package command built a file named guacamole-1.3.0.war in the /guacamole-client-1.3.0/guacamole/target directory (since the command was issued inside of the guacamole-client-1.3.0 directory). The .war file needs to be copied to the /var/lib/tomcat9/webapps directory. The cp command will be used to perform this task. We will also rename the file in the process for easier access via the web.
cd guacamole/target
cp guacamole-1.3.0.war /var/lib/tomcat9/webapps/guacamole.war
At this point it would be a good idea to restart the server to ensure everything will come back up after the reboot.
systemctl reboot
If you are unable to restart the server, restart the tomcat9, guacd, and mariadb daemons. You can restart multiple daemons at the same time. Simply place a space between each daemon name.
systemctl restart tomcat9 guacd mariadb
After restarting the server and/or services, confirm the status of each daemon.
systemctl status tomcat9 guacd mariadb
Press q to exit the status screen.
Step 15 - Login to Apache Guacamole, Create a New User, and a New Connection
Login to Apache Guacamole
Open a web browser on a computer that is on the same network as the Guacamole server. Enter the Guacamole server’s IP address followed by :8080/guacamole (e.g. https://YOURIPADDRESS:8080/guacamole).
Login to the Guacamole server using the default username and password.

Default username: guacadmin
Default password: guacadmin
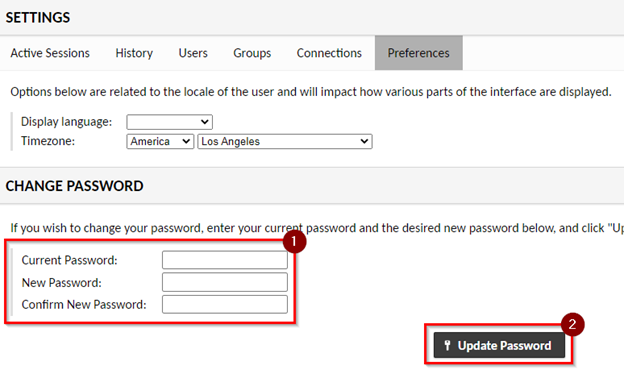
Reset the default password
- Click on the user drop-down (far right).
- Click on Settings.

- Click on Preferences.

- Use the Change Password form to change the default password.
Add a New User
- Select the Users tab.
- Click on the New User button.

At a minimum, ensure that you supply a username and password.
For the sake of user convenience ensure the following options are enabled under Permissions:
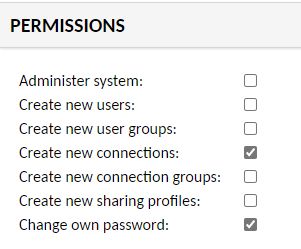
- Create new connections
- If this is not selected, the guacadmin account would need to create and share all connections with each user on the system.
- Change own password
- If this is not selected, the guacadmin account would need to reset passwords for users as needed.
For additional security you could make this user the new administrator (select all options). Then delete the guacadmin account. This would provide additional security by eliminating the publicly known default account.
Logout of guacadmin and login to the newly created user account.
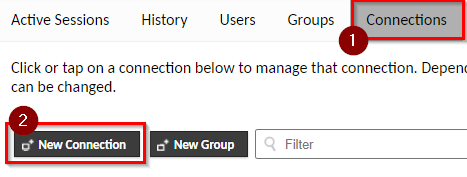
Create a New Connection
Return to the user drop-down (top-right of the page) and select Settings > Connections > New Connection.
Create a new connection. At a minimum you should specify:
- Name
- This will appear in the list of connections
- Protocol
- e.g. SSH, VNC, RDP
- Hostname
- Can be an IP address.
- Port
- Number for the applicable protocol.
- Username and Password
- This is for the remote system you are creating a connection to.
- Unfortunately, you cannot copy/paste passwords into the password field.
Configuring a Connection with a Private Key
If you are configuring an SSH connection that requires a private key, you will need to supply the private key to Guacamole in OpenSSH format.
Use the steps below to export the private key we created for our Guacamole server into OpenSSH format.
- Open the private key file (.ppk) using PuTTY Key Generator.
- Click on Conversions
- Select Export OpenSSH Key.
- Save the file to a location of your choosing. File will not contain an extension.
- Open the file using Notepad.
- Copy the entire contents of the file and paste into the Private key field.
Once the connection is created you can launch it from the Connections page, or you can use the user drop-down (top-right of the page) to return to the Homepage and select the connection from there.
Step 16 - Create a NO-IP Dynamic DNS Hostname
Because the Internet connection we are hosting this server on has a dynamic public IP address, we can’t guarantee that our current public IP address will always be the same as it is today. That means we can’t simply point a domain name to our current IP address and expect it to always work. We will need to utilize a dynamic DNS service that will update DNS servers on the web as our gateway’s IP address changes.
There are many dynamic DNS services available. Some router manufacturers include dynamic DNS services built-in (which is great and makes server access much easier). For the purposes of this demonstration, we will use NO-IP. They offer free hostnames that must be renewed every 30 days. You can upgrade to a pro account for less than $25 per year (as of 10/23/2021).
Once you have your hostname created, we will install the NO-IP Dynamic Update Client (DUC).
Change into your home directory.
cd /home/yourusername
Use wget to download the NO-IP DUC.
wget https://www.noip.com/client/linux/noip-duc-linux.tar.gz
Extract the DUC package.
tar xzf noip-duc-linux.tar.gz
Change into the newly created NO-IP directory.
cd noip-2.1.9-1
Run the following commands to make the install package and install it.
make
You should see results similar to the following:

make install
You will be prompted to enter your credentials. Upon successful login, the utility will determine how many hostnames you have. If you only have one hostname that will be utilized. If you have multiple, you will be prompted to select the applicable hostname to use. Additionally, you will be prompted to select the update interval. The default of 30 minutes should be more than adequate in most scenarios.
Next, we will need to create a script that will be used to start the NO-IP service each time the server starts. We will use the fantastic instructions provided at stuffaboutcode.com.
From the command prompt, enter the following command to create a new file in the /etc/init.d/ directory for our startup script.
touch /etc/init.d/no-ip-startup-script
Once the file has been created, we will open the file using pico.
pico /etc/init.d/no-ip-startup-script
We will then add the following contents to the file:
#! /bin/sh

		# /etc/init.d/noip
		### BEGIN INIT INFO

		# Provides:          noip

		# Required-Start:    $remote_fs $syslog

		# Required-Stop:     $remote_fs $syslog

		# Default-Start:     2 3 4 5

		# Default-Stop:      0 1 6

		# Short-Description: Simple script to start a program at boot

		# Description:       A simple script from www.stuffaboutcode.com which will start / stop a program a boot / shutdown.

		### END INIT INFO
		# If you want a command to always run, put it here
		# Carry out specific functions when asked to by the system

		case "$1" in

		  start)

			echo "Starting noip"

			# run application you want to start

			/usr/local/bin/noip2

			;;

		  stop)

			echo "Stopping noip"

			# kill application you want to stop

			killall noip2

			;;

		  *)

			echo "Usage: /etc/init.d/noip {start|stop}"

			exit 1

			;;

		esac
		exit 0
Once the above contents have been added we exit the file using CTRL + X and save the changes by pressing Y then Enter.
We will now make the startup script executable.
chmod 755 /etc/init.d/no-ip-startup-script
You can test starting and stopping the service with the following commands:
/etc/init.d/no-ip-startup-script start
/etc/init.d/no-ip-startup-script stop
Register the script to run at start-up.
/usr/sbin/update-rc.d no-ip-startup-script defaults
If you need to remove the start-up script, use the following command.
/usr/sbin/update-rc.d -f no-ip-startup-script remove
Step 17 - Configure Port Forwarding on Your Router
You should now login to your router and forward ports 80 and 443 to your Guacamole server. This will be different for every router, so the steps are out of scope for these instructions.
Step 18 - Create an SSL Certificate Using Certbot
You will need to have ports 80 and 443 forwarded to your server at this time.
Issue the following command to begin:
certbot --apache
You will be prompted to enter your email address, to agree with the terms, and select whether you would like to receive emails from the Electronic Frontier Foundation.

You will then be prompted to enter your domain name. I have used my NO-IP hostname (amguacdemo.ddns.net) in this example.
If successful, the utility will generate a new host configuration file located at /etc/apache2/sites-available with a filename of 000-default-le-ssl.conf
Test your NO-IP hostname in your browser to ensure that your site will load successfully and your preferred browser indicates that it is secure. If successful, you should see a padlock. The screenshot below was taken with Microsoft Edge.

Step 19 - Configure Apache for Reverse Proxy and Disable /var/www/html
Issue the following command to enable the necessary components of Apache:
/usr/sbin/a2enmod proxy proxy_http headers proxy_wstunnelRestart Apache
systemctl restart apache2Open the 000-default-le-ssl.conf file that was created by certbot
pico /etc/apache2/sites-available/000-default-le-ssl.confUpdate the ServiceAdmin email address with an applicable email address.
Add the following between the DocumentRoot and the comment that begins “Available loglevels: trace8, …,”
<Location />
Order allow,deny

Allow from all

ProxyPass http://localhost:8080/guacamole/ flushpackets=on

ProxyPassReverse http://localhost:8080/guacamole/
</Location>
<Location /websocket-tunnel>
Order allow,deny
Allow from all
ProxyPass ws://localhost:8080/guacamole/websocket-tunnel
ProxyPassReverse ws://localhost:8080/guacamole/websocket->
</Location>
Save and exit the configuration file using Ctrl + X.
Check the syntax of the configuration files.
/usr/sbin/apachectl -tSyntax should be reported as OK before proceeding.

Restart Apache
systemctl restart apache2Test your publicly accessible hostname (in our case this is our NO-IP hostname). Ensure that you are taken to the Guacamole login screen instead of the Apache default page. If you are not, confirm that inside of the 000-default-le-ssl.conf file, your location only contains a /.
For the purposes of this tutorial, and for the purpose of increasing security, while we are configuring Apache we will disable loading of pages or listing contents located in /var/html/www.
Using Pico, open the apache2.conf file located at /etc/apache2.
pico /etc/apache2/apache2.confLocate the section of the file containing a commented block that begins "Sets the default security model of Apache2 HTTPD server."
There are numerous directory listings below.

Modify the <Directory /var/www/> options.
FROM the following:
<Directory /var/www/>

		Options Indexes FollowSymLinks

		AllowOverride Allow

		Require all granted
TO the following:
<Directory /var/www/>

	Options -Indexes -FollowSymLinks

	AllowOverride None

	Require all granted
Save and close the file using CTRL + X.
Restart Apache.
systemctl restart apache2Attempt to access the server (not the Guacamole URL) from the publicly accessible web or IP address. You should receive a message from Apache indicating you do not have permission to access the site. You should still have access to the Guacamole login.
Step 20 - Configure Guacamole for Two-Factor Authentication
Guacamole provides support for several two-factor authentication services. We will be using TOTP since it is 100% free and does not require signing up for a third-party service.
Change into your home directory.
cd /home/yourusername
Download guacamole-auth-totp-1.3.0.tar.gz using wget.
wget https://dlcdn.apache.org/guacamole/1.3.0/binary/guacamole-auth-totp-1.3.0.tar.gz
Extract the contents of guacamole-auth-totp-1.3.0.tar.gz
tar -xvf guacamole-auth-totp-1.3.0.tar.gz
Change into the newly created guacamole-auth-totp-1.3.0 directory.
cd guacamole-auth-totp-1.3.0
Copy the guacamole-auth-totp-1.3.0.jar file to /etc/guacamole/extensions
cp guacamole-auth-totp-1.3.0.jar /etc/guacamole/extensions
Restart Tomcat9
systemctl restart tomcat9
Log back into Guacamole.
Upon successful authentication, you should be prompted to setup multi-factor authentication. You’ll need a program such as Google Authenticator or Authenticator from Microsoft installed on your mobile device to proceed.

Using your preferred authentication application follow the process to add a new site and scan the QR code.
Once the code has been scanned a new account should be added to your authenticator app.
Use the generated code to continue the logon process.
Unfortunately, the guacamole-auth-totp-1.3.0 extension does not provide an easy way to reset the two-factor authentication. Thankfully, there are many people online who have already encountered this problem and have great instructions. The steps below are from Sebastian Mogilowski’s Blog.
We will need to access the MariaDB console. Enter your MariaDB root password when prompted.
mariadb -u root -p
Select the guacamole_db database.
USE guacamole_db;
Acquire the user ID of the user that needs to have their two-factor authentication reset. In the example below we will get the user ID of the “guacadmin” account.
SELECT user_id FROM guacamole_user INNER JOIN guacamole_entity ON guacamole_entity.entity_id = guacamole_user.entity_id WHERE guacamole_entity.name = 'guacadmin';
Once the user ID is returned, issue the command below that will effectively reset two-factor authentication for the user.
UPDATE guacamole_user_attribute SET attribute_value='false' WHERE attribute_name = 'guac-totp-key-confirmed' and user_id = '1';
Exit MariaDB console.
quit;
Have the user log back in and re-setup two-factor authentication.
If you ever need to disable two-factor authentication you can simply remove the uacamole-auth-jdbc-mysql-1.3.0.jar file from /etc/guacamole/extensions. You could move the file to your home directory while you make the necessary changes then move it back.
mv guacamole-auth-jdbc-mysql-1.3.0.jar /home/yourusername
Once the file is removed, delete the file from the extensions directory.
rm guacamole-auth-jdbc-mysql-1.3.0.jar
Once you’re ready to re-enable two-factor authentication, copy the file from your home directory back to the Guacamole extensions directory.
cp /home/yourusername/guacamole-auth-jdbc-mysql-1.3.0.jar /etc/guacamole/extensions
Step 21 - Install and Deploy Fail2Ban
For protection against Distributed Denial of Service (DDos) and dictionary password attacks we will install fail2ban. We didn’t do this in the beginning to reduce the potential of locking ourselves out.
We’ll install fail2ban using the Debian repositories:
apt-get install fail2ban -y
Now, we just need to ensure that the sample configuration file is deployed.
cp /etc/fail2ban/jail.conf /etc/fail2ban/jail.local
You can view the configuration by opening the configuration file:
sudo nano /etc/fail2ban/jail.local
Troubleshooting
Guacamole Admin Web Page is Not Loading
If you are not greeted with a login screen but receive either a blank page or an error message:
- Establish a separate SSH session to the Guacamole server. You’ll want a separate session so you can issue commands in one window and view the log output in the other.
- Issue the following command to monitor the Tomcat9 log file in real-time.
tail -f /var/lib/tomcat9/logs/catalina.out
- Reload the website and review any error messages that appear in the log.
- If errors persist, return to the SSH session where you are not viewing the catalina.out log file and restart tomcat9.
systemctl restart tomcat9
Watch for errors in the catalina.out log file. Research any specific error messages.
Default Username and Password Are Not Working
- Ensure that the username specified in the guacamole.properties file is correct.
- Ensure that the username and password added to the database are correct. The easiest way to test is to attempt login to MariaDB using the username and password you specified for the guacamole_user account.
mariadb -u guacamole_user -p
- Ensure that mysql-connector-java-8.0.13.jar is in /etc/guacamole/lib
- Ensure that guacamole-auth-jdbc-mysql-1.3.0.jar is in /etc/guacamole/extensions
- Ensure that Tomcat can see the contents of /etc/guacamole
ln -s /etc/guacamole/* /var/lib/tomcat9/lib/
Other Errors Encountered
During the development of this tutorial there were several errors that needed to be overcome:
- The “mysql” authentication provider has encountered an internal error which will halt the authentication process
- Moving the mysql-connector-java-8.0.13.jar file into the /etc/guacamole/lib directory resolved the issue.
- Cause: java.sql.SQLException: Error setting driver on UnpooledDataSource. Cause: java.lang.ClassNotFoundException: com.mysql.jdbc.Driver
- This is another example of not having the connector file in the correct directory.
- JDBC connection is failing due to server time zone value is set to ‘PDT’
- MariaDB global time zone was using “SYSTEM” which Guacamole was not cooperating with. Setting to a local time resolved the issue.
- The server time zone value ‘PDT’ is unrecognized or represents more than one time zone.”
- Same as above. MariaDB global time zone was using “SYSTEM” which Guacamole was not cooperating with. Setting to a local time resolved the issue.
Updates
Planned
- Need to address Certbot certificate expirations.
- Addition of a pros and cons section to help an individual decide whether a Guacamole deployment is right for them or not.
Completed
- 12/18/2021
- Updated Step 15 – Login to Apache Guacamole, Create a New User, and a New Connection to include information about establishing an SSH connection to a server that requires a private key.
- 12/17/2021
- Updated Step 20 – Configure Guacamole for Two-Factor Authentication to reference Microsoft Authenticator in addition to Google Authenticator. Microsoft Authenticator (known simply as Authenticator in the Google Play Store) provides additional features that Google Authenticator does not. Such as requiring a passcode or biometrics to open, and synchronization across devices.
- Changed the title of Step 19 from Step 19 – Configure Apache for Reverse Proxy to Step 19 – Configure Apache for Reverse Proxy and Disable /var/www/html.
- This was added to disable loading of the default web page located in /var/www/html and to prevent directory listing.