by andymelton | Mar 27, 2007 | Software
I was telling a friend about my experience with offline blogging software. He pointed me to MarsEdit. I hadn’t heard of it before, it wasn’t a free application. I usually don’t download anything but free software. This time I did download it and after using MarsEdit for a couple of weeks I decided to buy it. I have been using it ever since. I like it a lot and want to talk about what I like and some of the things that I would like to see in the application.
Why do I need this type of software?
You may be wondering what the point is in having offline blogging software. The main reason is because when I want to write a blog entry I hate having to open the browser, go to the blog, login and make a new entry. I’ve had bad experiences with writing blog posts and emails in the browser window. I am scared to death while I write my post the browser is going to crash! I know a lot of blogging software such as WordPress saves your post while you’re working on it. In my experience though, it’s never enough!
Another reason for offline blogging software is if you are like me and you have multiple blogs, it is really nice to be able to update them all from a convenient location. Currently, I have 4 blogs plugged into MarsEdit. Whenever I need to make a post on one of them I can simply open the application and make the post. Also, if I see a mistake that I have made in my entry it’s so much easier to open MarsEdit, make the change and re-submit instead of having to go to the browser, to the blog, re-login, etc. I can blog much more easily and more often!
What I like about MarsEdit
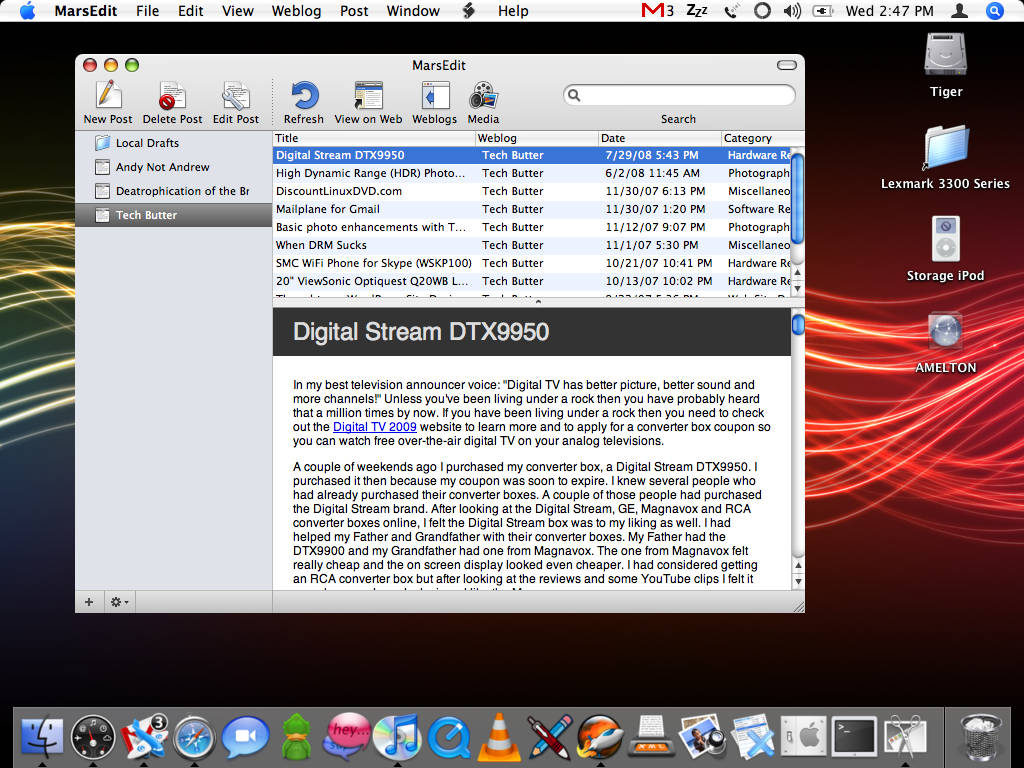
First of all I have to say I absolutely love the MarsEdit icon! I know I don’t talk about the icons of applications a lot but this is one of my absolute favorite icons. It’s very sexy on my dock!
There are a lot of great features in MarsEdit but there are not a ton of icons cluttering up the application. It’s very simple and clean and I really like that. Instead of having an icon for every little thing there is a drop down menu with a lot of options for inserting HTML or custom tags. I also love the fact that there are keyboard shortcuts for a lot of these, especially the command to paste a link (Option + Command + A).
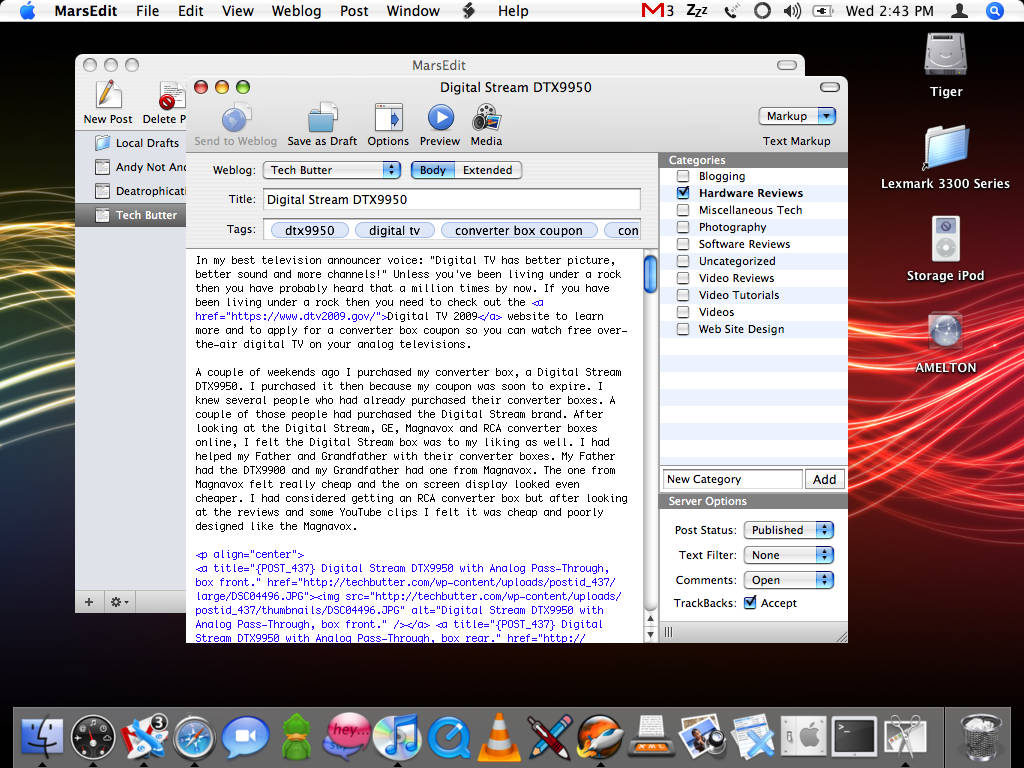
For each blog you have, you can set up different options. You can choose what warnings you want to receive before your entry is posted; such as warning you if you’ve not set a category or entered a title for your post. You can also choose which services you would like to ping to let the blogging world know that you’ve just made a new entry on your blog.
I also really like the simplicity of the “Save as Draft” button. You click the button as many times as you’d like while you are working on your entry. If you exit the application you can come back and work on it at a later time. But what I really like about it is the fact that whenever I finish the post and I post it to my blog it is no longer in my drafts folder. In my opinion it’s a much better option than using the typical “Save” or “Save As.”
What I’d like to see in MarsEdit
The first change to the application that I would like to see is whenever you are uploading images to your post that the application know which blog you are working on and upload to the appropriate folder.
Using MarsEdit you can choose whether people can leave comments & TrackBacks for your entries. However, you cannot make a password protected post, change the slug, or many of the other things you can do with a WordPress blog.
Although I really love this application and am glad that I made the purchase of it; there is one more thing that I would really like to see added into this application. That is the ability to make new categories. You can select from already created categories but you can’t make new ones (to my knowledge). I have to post the entry and then go to the website and add the proper categories. Granted, I’d have to go to the website anyways to make sure the entry was posted correctly. It would just be really nice not to have to log back in if everything else is correct just to add a category.
I know what you’re probably thinking after reading those two paragraphs above and I’m going to address it right now. Since this application is a cross platform (supports many content management systems) blogging tool; it would be extremely difficult to get every single option that all the blogging platforms offer into the application. I don’t think it would be impossible but it would be difficult because there are always new features to all of these blogging platforms. Also, I am sure there are some limits as to what developers can implement with some blogging systems due to the fact that some systems are closed source.
Do I recommend this application to others?
Yes, I most certainly do recommend it. Since purchasing the application I have blogged a whole lot more because of it. It’s so nice just to be able to open up an application and start blogging. I realize there are other applications out there, even free alternatives. In my opinion none of them can compare to the ease of use of MarsEdit or how fast it works (the others took FOREVER to launch and were very clumsy). MarsEdit offers a LOT of features, I barely scratched the surface! I feel as though my $24.95 was well spent!
MarsEdit from Red Sweater Software
Article update: Wednesday, October 1, 2008: I have updated this article with screen shots from the latest version. I also updated the grammar, at least, I tried to. I have been updating the screen shots on TechButter so that the pages look uniform with the new theme.
The image uploading tool has been improved. You can now specify which blog you are uploading to. When you do open the image uploading tool it connects to the blog you are currently working on. You can now choose from previously uploaded images or images in your catalog. Also, you can connect MarsEdit to Flickr and use images in your account.
The ability to make new categories has been added. Also, you can now change the post slug (what the URL of the post will be). You can also edit the post excerpt and the tags. To my knowledge there is no way to password protect a post using MarsEdit.
I have to be honest with you. Although I really love MarsEdit and have paid for the updated version, I don’t use it as much as I use to. If I were on my Mac more often I probably would. Since getting a new monitor for my PC I’ve been using my Windows machine as my primary workstation again and I post entries to my blog using my web browser. I do think MarsEdit is a great application and would highly recommend it to anyone looking for that type of functionality.
by andymelton | Mar 26, 2007 | Software
When I first got my Mac there was a productivity plunge. I knew it would just take me a while to build up speed with OS X but this application helped me out a lot. On Windows whenever you Alt + Tab you get a list of the open windows. Whenever you Command + Tab on a Mac you get a list of the running applications. I prefer the Windows way because I like to quickly get to the window I am needing access to.
Whenever you are simply switching between running applications you have to take a couple of steps, you have to switch to the application and then you have to select with your mouse which window in that application you are wanting to focus in on. The less I have to take my hands off of my keyboard the more productive I am.
I have my old Windows keyboard connected to my Mac through my KVM switch. This allows me to be even more productive, at least on my setup. I can use the Alt + Tab command on my Windows keyboard and it will bring up the Witch task manager. I can quickly go to the window I need access to. This is really great for instant messaging because I can quickly get to the IM window and then back to the application I was previously working in.
Installation is fairly simple. Double click and it installs into System Preferences. You have to go to “Universal Access” and check a box beside “Enable access for assistive devices.” Once you do that, Witch will work.
Witch has a lot of customization options. You can choose the key commands, animation options, applications to ignore, etc. If you’re coming from Windows to Mac OS X you’ll probably greatly benefit from this application the most.
Witch Homepage
by andymelton | Mar 20, 2007 | Software
When I am designing a theme for WordPress I always install a copy of WordPress onto my local server. I have my server set up in a virtual machine. It’s aggravating because I have to wait on that virtual machine to start up before I can do anything. I have been thinking about installing Apache, MySQL, PHP and phpMyAdmin onto my Mac so I can just leave it running and have a copy of WordPress running locally for whenever I need to test something. I just haven’t had the time to do this yet.
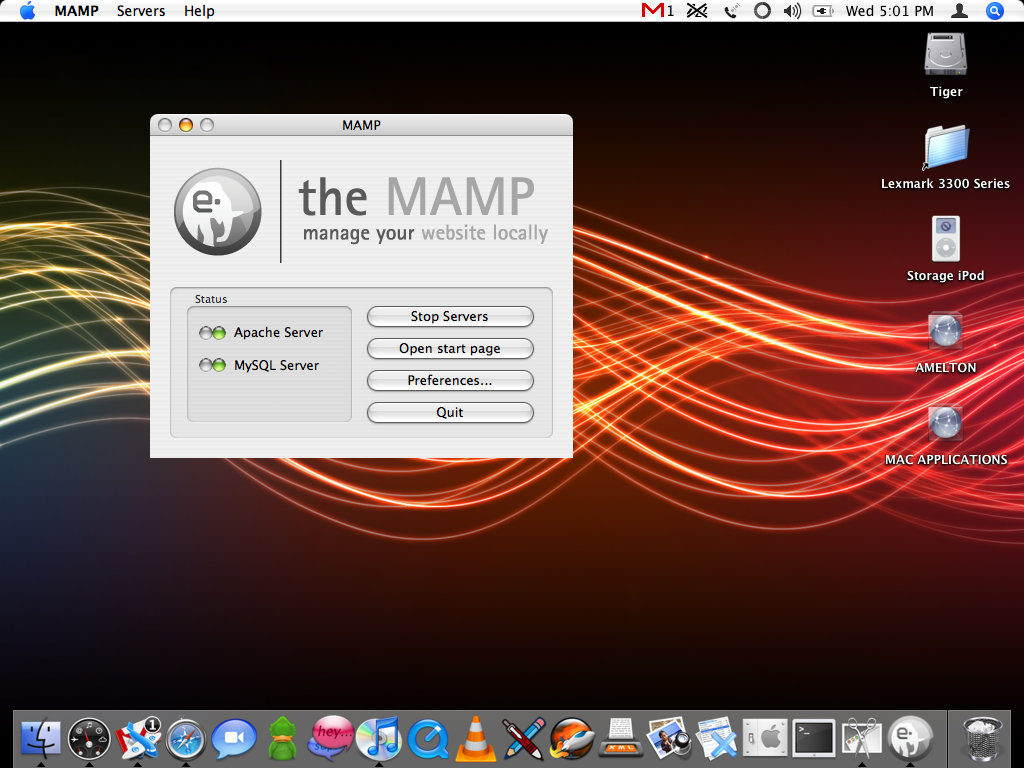
On my Linux virtual machine I have a copy of XAMPP running. I got to looking around and there is a version of XAMPP for the Mac but it only runs on Intel Macs. The iBook that I have has a PowerPC G3 processor, so that won’t work. Fortunately there is an alternative called MAMP. It’s got the basics of XAMPP and works pretty well. I downloaded it this morning, extracted and installed it.

I guess I should say what XAMPP and MAMP are. They include Apache, MySQL, PHP, phpMyAdmin and a few other things all in one package. They’re usually meant for developers on a network to test out projects and usually not meant for deploying websites publicly. You usually just install a package and you have a web server.

In under 20 minutes I was able to have WordPress up and running. It would have been quicker had I not run into a database connection issue. Also, the download was quite large, over 100 megabytes so I had to wait on that. The database problems that I ran into was that you can’t simply use ‘localhost’ as the MySQL server address, you have to use a port. I tried to use ‘localhost:8889’ but that did not work either. I then used the IP address of the machine ‘192.168.1.44:8889’ and that worked.
This is a great option for testing websites. I haven’t looked into it yet but if MAMP can be secured then I think it would be a good option for someone wanting to play with hosting their own websites or blogs. If you use XAMPP on Linux then you’ll know that you can easily secure XAMPP by running a simple command from the command line and answering a few questions. However, if MAMP can’t be secured then I think it’s still a good option for testing websites locally.
Other than making sure XAMPP is secure you’ll want to install an FTP server. There is an FTPd daemon already included in OS X. You can use PureFTPd Manager for Mac OS X to manage it.
If you’re not on a Mac I would recommend Uniserver or XAMPP.
MAMP
by andymelton | Mar 10, 2007 | Software
Since I got my iBook G3 I have been searching for ways to increase it’s performance. Last night I was doing a search and started reading through an article that I saw a while back that I didn’t read before because it was quite long. In the article I saw a link to an application that would disable the shadows around window borders and speed up your system. The application’s website said that it would significantly improve performance on older G3 Macs.

I downloaded, installed and ran the application. I was immediately blown away. The application disabled the shadows and my system was much more responsive. The mouse felt much more responsive and windows opened and closed much faster. I opened up iTunes and could even use cover art. I’m not sure if this is because of the latest iTunes update or because of ShadowKiller. I do know that before I upgraded to the latest release of iTunes that I could not use the cover art browser.

When I first ran this application I was very pleased with the added performance that I gained from disabling the shadows. I had to reboot my system last night and when I logged back in the shadows were back so I had to disable them again. I can simply add the application to startup items to solve that problem. After I had rebooted and disabled the shadows I was not as blown away with the speed increase. I’m not sure why this is and would welcome feedback on that. Maybe my system was just needing to be rebooted. I’ll continue to use the application because it does speed up the system somewhat, just not as much as it did when I first killed the shadows.
It takes a little bit of getting use to not having the shadows. As I was typing this entry I had the window in front of another window with a white background and could not tell that the window I was typing in was shorter than the other window (I hope that made sense).
Unsanity ShadowKiller
by andymelton | Feb 12, 2007 | Software
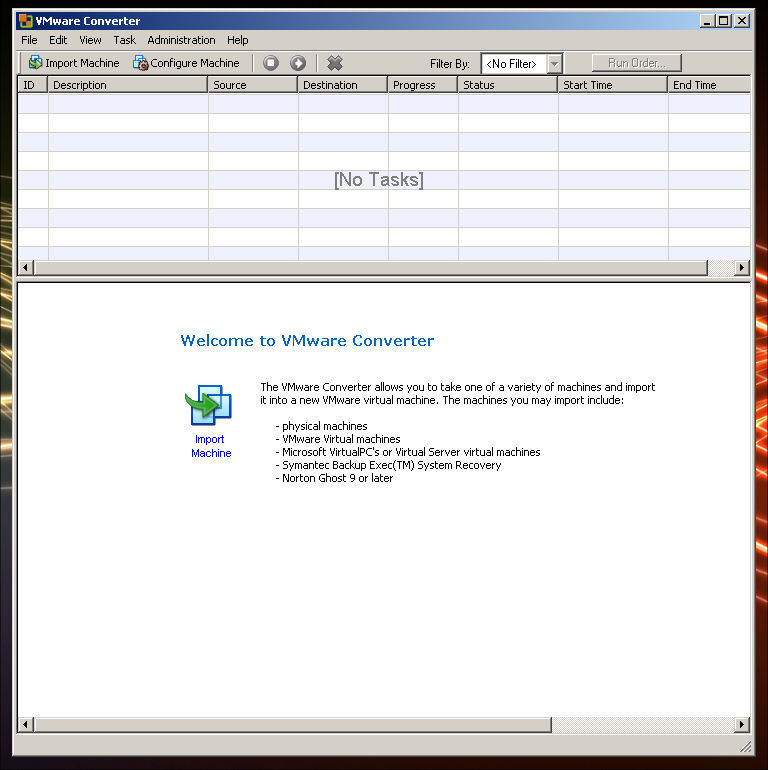
This morning as I was browsing the del.icio.us feeds that I subscribe to I came across an application that I’ve been playing with for most of today. It’s from one of my absolute favorite software vendors, VMware. The software is called VMware Converter. I’m not sure how long it’s been out and I am really sorry that I missed this one if it’s been out for a while.
Let’s say that you’ve got an aging computer or an aging server. You’ve also got a newer computer. You could take the old computer’s operating system and import it into a virtual machine. The virtual machine could then be run on your newer computer without taking up as many resources. You also get the added benefit of freeing up space. More importantly, you also save energy. Your newer computer may take a little bit more electricity to power the virtual machine but it’s not going to be near as much as having to power on another computer. In my experience you also make things quieter since older hardware tends to be noisier.
Businesses have been flocking to virtual machines for all of the reasons mentioned above. It’s simply no longer cost effective to buy a new piece of hardware to simply run a piece of software. Businesses have also been using virtual machines for legacy applications. They take their old applications and put them into a virtual machine which frees up rack space and saves energy by getting rid of the dedicated box that was running the software.
Another reason that someone might want to do this is if they were upgrading to a new computer and were going to get rid of the old one. They could import every file and setting on their current machine and access those files or settings through the virtual machine. People who are switching to Macs could use this to run Windows on their Mac, in theory. They could take the virtual machine of their old computer and run it in VMware Fusion (currently in Beta) or they could buy Parallels and convert the image type and run it on Parallels.
Ease of Installation
The installation on my main desktop machine went without any hitches. It’s just a standard installer. However, the installation on the target computer was a little bit more difficult. The computer I was going to turn into a virtual machine is my aged Toshiba Satellite 315 CDS (200 Mhz, 32 MB of RAM and 6 GB of hard disk space running Windows XP Professional). I ran the installer the first time and I kept getting this error message: “Error 1920: Service VMWare converter service (ufad-p2v) failed to start. Verify that you have sufficient privileges to start system services.”
I googled the problem and then I went to VMware’s discussion forum where someone suggested that the user that was running the application needed to be able to run as a service. I went into the Local Security Policy of the laptop and explicitly gave the Administrator account privileges to logon as a service. I rebooted the machine and I installed the VMware converter agent without a hitch.
I then turned to my server and tried to import the laptop as a virtual machine. It continued to fail. I kept trying to find solutions to the problem but could not find anything. I then decided that I would install both the converter agent and the converter manager onto the laptop so that I could simply do an import of the local machine. I then kept getting the error message that I mentioned above. I looked around for solutions to the problem and then finally I decided to look in Windows Services to see if maybe I had a service disabled that the software was needing. Sure enough when I looked at the dependencies for the VMware Converter Service, the services it needed were not enabled. I enabled them and had the installer to keep retrying to start the VMware Converter Service. It would not so I went back into the Windows Services and tried starting the service manually. However, I kept getting an error message that said “Error 1053: the service did not start in a timely manner.” I thought, “OK, this is a slow machine. I’ll just try again.” Finally, about the fourth time the service started and I was able to install the software.
I turned to my server again and tried to import the computer but it kept getting to 97% and failing. I turned to the laptop and tried to create a virtual machine on the laptop itself. VMware Converter on the laptop would also get to 97% and fail.
Unfortunately, this problem has not been solved. I’ve submitted my problems to the VMware forum and hopefully someone will be able to suggest something or they’ll update the software.
Physical to Virtual
I was finally able to convert a physical machine to a virtual machine. I decided to try creating one of my server and it completed successfully. The process took about 20 minutes to complete. It will vary depending on how large your hard drive or partition is.
A couple of things to note is that whenever I did this and started up the virtual machine, Windows said that there was a significant hardware change and that I would have to re-activate my copy of Windows and that I only had 3 days to do so. This means that after 3 days you’ll no longer have access to your Windows virtual machine. However, if you’re re-installing Windows and trying to get back up and running this will at least let you be able to get settings for your software or get your files. Just make sure when you create a virtual machine of your physical computer that you check all the drives you save files onto when it asks you which drives you want to be a part of the virtual machine. Make sure you’ll have room to actually create the virtual machine! Example: If you’ve got 20 gigs to back up, make sure you’ve got a 40 gig hard drive.
Another thing that I had to adjust when I created a virtual machine of my physical machine was that I had to decrease the amount of RAM in the virtual machine. I have 1 gig of RAM in my physical machine and VMware was trying to give the virtual machine 700+ megabytes of RAM. I reduced this to 256.
Also, once you get the virtual machine up and running, you’ll definitely want to get VMware Tools installed as quickly as possible. Otherwise, working with the virtual machine is unbearable.
Cost of VMware Converter
As far as I can tell, VMware Converter is freeware from VMware. They do have an Enterprise version that allows you to do simultaneous imports, export local and remote virtual machines and gives you the ability to clone a computer using a boot CD. For general purposes VMware Converter free edition is enough and I am truly appreciative of VMware for giving it away.
Running your new virtual machine
Now that you have a virtualized copy of your physical computer how are you suppose to run it? There are several options available to you. The free options are to install one of VMware’s free virtualization products. Either VMware Player or VMware Server (which is what I use and prefer). With VMware Player you can “play” virtual machines but cannot create them. With VMware Server you can create virtual machines and run as many as your computer can handle.
VMware Converter
[tags]vmware, virtualization, vmware server, vmware player, vmware converter, energy efficient computing, mac, vmware fusion, fusion beta, parallels, toshiba, satellite, toshiba satellite 315 cds, xp professional, error 1920, ufad-p2v, local security policy, windows services, error 1053, freeware, free virtualization, andy melton, andymelton.net, free software[/tags]