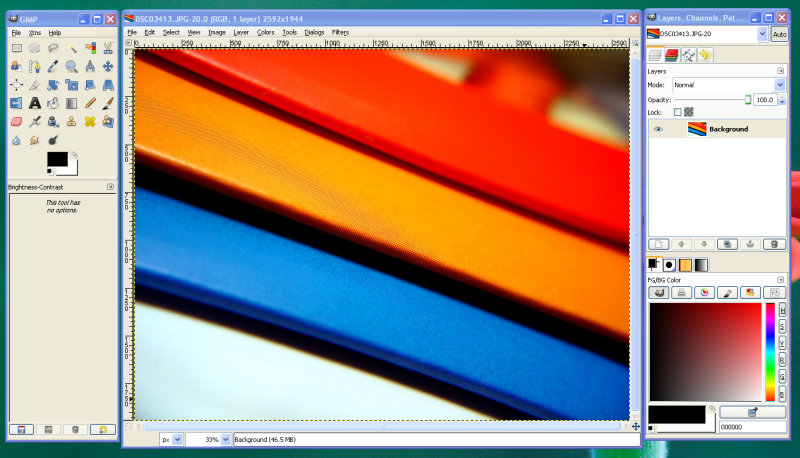
For a while now I have been using the trial version of Adobe Photoshop Lightroom. The trial expired and it’s still a bit too much for me to pay for. I love Picasa but it doesn’t have all the features that Lightroom spoiled me with while I was using it. Fortunately, there is The GIMP (Gnu Image Manipulation Program). It’s free which is the part that matters to most people. It’s got a ton of features and is comparable to Adobe Photoshop in many aspects. I’ve been using The GIMP on and off again since 2003. I have always wanted to switch to it because I love free and open source software. Unfortunately, I’ve never been able to completely switch because I haven’t taken the time to sit down and learn it. Fortunately, with the latest version of The GIMP I am able to say that it can become my primary photo enhancement/editing tool. One of these days I hope it will become my tool for creating web graphics, but that’s another post for another day.
Although I am not very fluent with the GIMP for creating web graphics I have been using it for the past couple of weeks to enhance my photos before I upload them to Flickr. I don’t know how to do really cool effects, yet. Those will take time. But for the most part whenever I pull images off of my camera I really only need to do a few things like: increase saturation of individual colors, white balance correction, brightness/contrast and sharpening. Picasa from Google will do most of those but it doesn’t really allow you to fine tune color saturation like I was spoiled with while using Lightroom. Now, some people may think that it’s wrong to increase the saturation of colors in a photo but in my opinion I am going to make the photo look exactly like I remember it.
White Balance
Whenever I first open a photo to enhance the first thing that I do is use the auto white balance tool (Colors >> Auto >> White Balance). It’s a very quick and simply way of ensuring that your whites are whites. It’s like bleach for your photos. The great thing about this bleach is it’s color-safe, too! Ok. Seriously though it really does help, for the most part. A lot of times I will take a photo of an object, like a flower, on a white piece of paper with two desk lamps hovering above it. The two desk lamps have regular incandescent light bulbs in them and they generally produce a yellow cast in my images. Using the auto white balance the yellow cast is usually removed quickly and effortlessly.
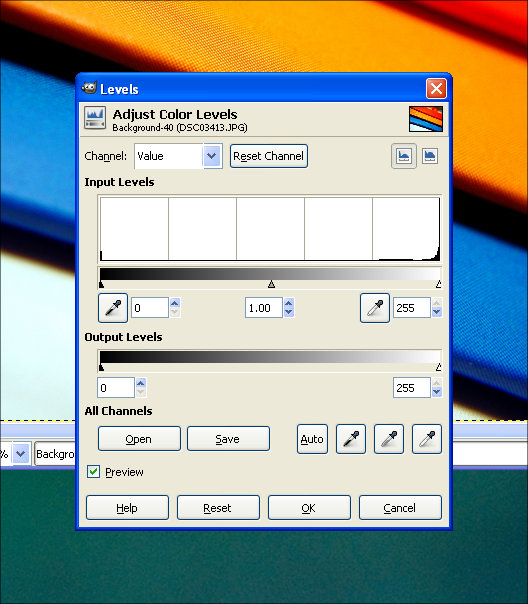
If the auto white balance tool doesn’t work to your liking (which it sometimes won’t, count on it) another way to get the white balance correct in an image is to use the levels tool (Colors >> Levels). When the dialog box opens you can use the eye dropper tool on the far left to choose a spot on your photo that is completely black. Using the eye dropper tool on the far right you will choose a spot that is completely white. I have generally found that if there isn’t a completely white point in my photo choosing only the black spot works pretty well for correcting white balance. The same goes if there isn’t a black point in my photo, simply choose a white point. Also using this tool you can choose a gray point in your photo using the middle eye dropper under “All Channels.”
Color Enhancement
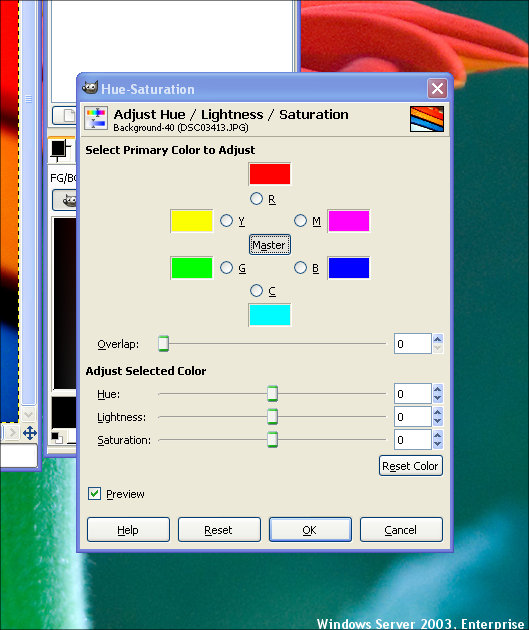
A lot of times when I pull images off of my camera and get to looking at them I think the colors are a little duller than what I remember the object I took the photo of being. In actuality it may not have been but what I remember isn’t what I’m seeing so I want to correct these. By going to Colors >> Hue-Saturation you can improve what you see by adjusting the hue of the color, the lightness and the saturation of the primary colors (red, yellow, green, cyan, blue and magenta). The lightness setting is really useful if you have a photo that came out dark and you have a photo where you really only wanted that color to stand out anyways. Increase it’s lightness value and optionally it’s hue and saturation and it will really stand out.
I will caution you on one thing. Don’t use too much saturation. One obvious reason is that your image will wind up looking fake (leaves are generally not neon green!). Also, if you increase the blue too much you’ll notice it really quickly because you will start seeing spots in other parts of your photo where you didn’t even know there was blue. The same holds true for any color. Just be realistic with this tool. In my opinion as long as it looks good and is believable then it’s okay, unless of course you want neon pink grass!
Brightness/Contrast
Before I talk about contrast I want to say something quickly about brightness. I don’t use the brightness tool of image editing applications a whole lot. I do, just not often. I only use it in extreme cases. I find that when I use the brightness tool that my images become too grainy to be accepted by my extremely critical eyes. Also whenever I use the brightness tool I find myself quickly adding more contrast to a photo. I try to avoid the brightness tool. You however may have different opinions on this so experiment with it.
Using the contrast tool (Colors >> Brightness-Contrast) is something that I am very fond of. Adding contrast to an images is one of the quickest and easiest ways to enhance your photos. Adding contrast to a photo deepens the dark colors of an image while still allowing the bright colors to shine through more brilliantly. Let’s take a photo of a flower as an example. The flower petals are bright and beautiful but there is a slight problem, they aren’t as brilliant as we remember them. Adding just a little bit of contrast will help increase the beauty of the photo immediately.
Again, this is something to use in moderation. Using The GIMP I generally start out with 5, 10 and 15 but try my best to stay under 15 if it’s at all possible. Play around with it though and see what it does. See what works best for you!
Converting Color to Black and White
When my parents were growing up the only option for photography was black and white. Now the default is color and you have to either buy black and white film or change your camera’s setting to black and white. I normally tend to only shoot in color and adjust the colors after I have taken the images off of my camera. That way I can decide whether I want the image to be in color, black and white, infrared, cyan or any other number of wacky color combinations.
There are many different ways to change a color image to black and white using The GIMP. The quickest and easiest way is to click on Image >> Mode >> Grayscale. You can also click on Colors >> Hue-Saturation, making sure that “Master” in the center is selected and move the Saturation slider all the way to the left or enter a value of -100.
Image Sharpening
Sometimes we are not able to capture an image as sharply as we remember. Fortunately for us sharpening is a standard feature in image editing applications today. It’s a bit harder to find in The GIMP than you’d expect but it’s located at Filters >> Enhance >> Sharpen. In that same area there is another tool called Unsharp Mask that you might enjoy playing with. I won’t go into detail about sharpening images because that’s pretty straight-forward. There are plenty of techniques you can use in The GIMP to sharpen an image, one in particular I am wanting to try out soon is called “Smart” Sharpening.
Image Cropping/Rotation
Another simple alteration that you’ll probably want to make on some of your photos is to crop them. Crop someone out or crop just the important part of a picture. Select the rectangle select tool from the tools dock (on the left by default), draw a selection of what you’d like to crop and adjust it to your liking and click on Image >> Crop to Selection and there you have a cropped image. Remember to not crop your images too much or when you print them you won’t have enough of an image to stretch out across the paper and the image will be blurry or pixelated.
Along with cropping an image you’ll probably occasionally have to rotate a few of them. That’s very simple as well. Go to Image >> Transform and choose which direction you would like to rotate your image.
Final Thoughts
I realize that this tutorial is fairly basic. I wanted to write it because when someone new to photo editing opens a program like The GIMP they are blown away by all the features and options that it offers. My hope is to give you a few tips that you can use to jump into The GIMP and start editing your photos. I think once you do jump into the program you’ll start to learn more about it. You’ll find many other tutorials online and like I said, I’m still learning it as well so when I learn something new I will be writing a new tutorial!
One other thing I would like to suggest is to make sure you follow my advice for backing up your digital media collection. What I have been doing is pulling photos off of my camera, copying the ones I like and want to edit into another folder. If I edit them there and save them and later decide I don’t like the change that I made I can go back and retrieve the original photo and adjust the photo again.
When you do save an image, make absolute certain you are saving the image at the highest quality possible. The GIMP defaults to something in the 90-98 quality range. If you’re uploading your photos to Flickr or going to print these photos, increase the slider to 100% and save it as the default. Also, make sure that you go to the advanced options to make sure the “Save EXIF data” option is checkmarked. This is one really great thing about digital photos if you can get the exposure, time/date, frame, camera model, etc from the data saved in the file. Make sure this data is retained!
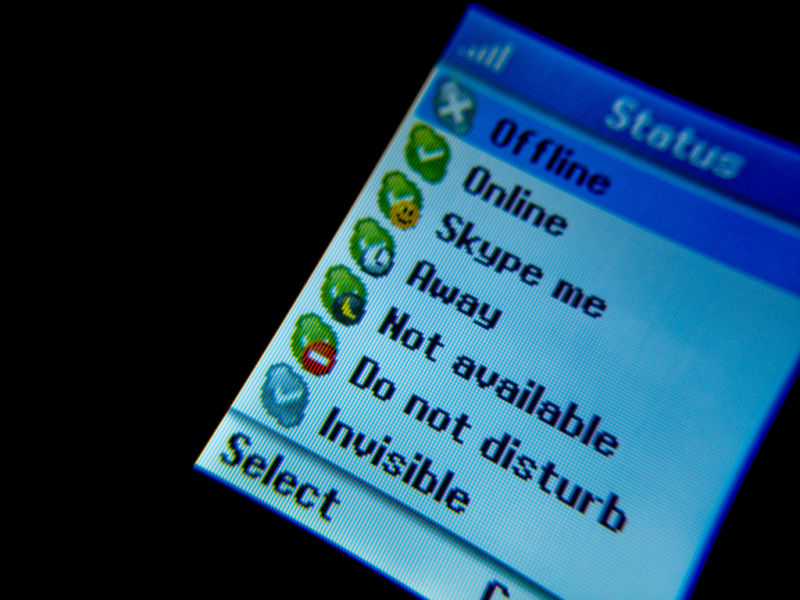
A couple of years ago I had a no-contract cell phone and before then I had a pre-paid cell phone. I got rid of those in 2005. They were simply too expensive. Ever since then I’ve been using Skype, Gizmo or just using the house land-line to make telephone calls. I’ve recently started getting more calls on my SkypeIn number because that’s what I give to friends, clients, recruiters and potential employers. Lately though, I have not been able to get to the computer quick enough to answer Skype. The problem is I have to go to the computer, sometimes login (usually locked when I am away), un-mute the microphone in Windows volume control, un-mute the microphone on the headset cable, put the headset on and answer the call. Heaven forbid if I’ve been using a piece of software that change’s my Skype input/output devices because if that’s the case I have to change those, too!
So you see the problem! I needed to get something that I could answer very quickly. For a while I had been wanting to get a WiFi phone for Skype. The problem is that they were still really expensive. Most of them were between $150-200. I didn’t want to spend that much. I thought about getting one of the cordless dual-mode phones but the ones that were actually affordable required you to connect them to your computer. There are models that do not require you to connect them to your computer but they cost more than the WiFi phones. The problem for me is, if I’m still in bed and a potential employer calls I wouldn’t know it because I have been turning the computer off during the night because it’s really loud and of course, I’m in sleep land. Also, the idea solution was to get something that I could take with me if I were to go on a trip, interview, vacation (ha, ha, whatever) or somewhere that was out of the area and possibly had a WiFi Internet connection.
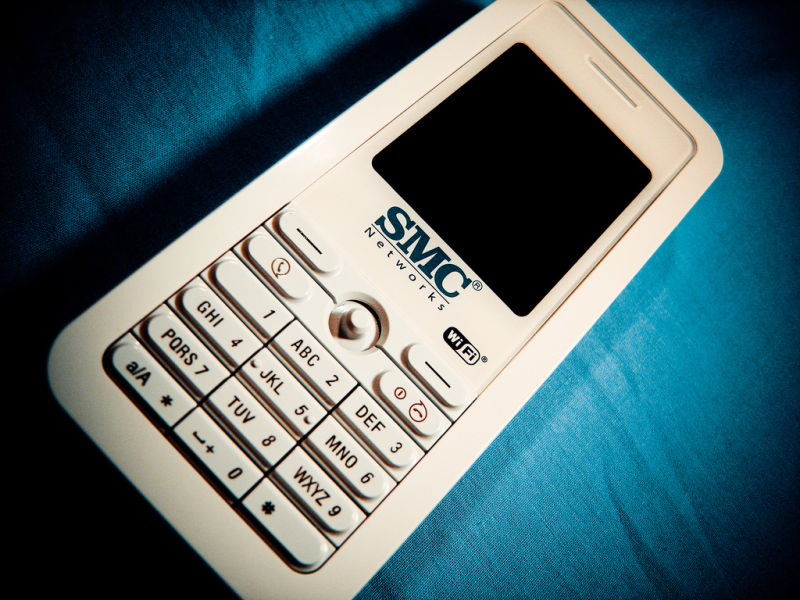
I got onto Skype’s website a couple of weeks ago and saw the SMC WiFi Phone for Skype for $99 which I thought was a great deal. Everywhere else has the exact same model for between $130-170. The Belkin model (which is exactly the same as the SMC model other than the color and branding, in my opinion) was more expensive. I pondered on purchasing the SMC model for about an hour and I went ahead and purchased it. I have been using the phone for a week now and although I have already wrote in length about why I purchased the phone, I have a lot more to say about the phone (features, likes, dislikes, etc).
Arrival, setup, included features
The phone was shipped quickly and arrived in packaging that reminds me of typical cell phone packaging. The box contained the SMC Skype WiFi Phone, earphone, power adapter, USB cable, battery and a CD containing the user manual (nothing else is on the CD), printed user manuals (in 3 languages). In the box there is also a gift of 120 SkypeOut minutes and 3 month’s free voicemail. I was pleased with this because with my SkypeIn number I get free voicemail. With the card I was able to extend my voicemail for 3 additional months and I had just extended it a few days prior to receiving the phone. So I won’t have to do that for 6 months which is very nice. Of course I also got the 120 SkypeOut minutes but for me I do not worry much with those as I paid for the entire year of Skype Unlimited. Regardless, it’s still very nice.
Before turning the phone on and setting it up it says to charge it for 8 full hours which is fairly a standard suggestion on almost all electronics. After the phone had been on charge for 3 hours it said that it was charged. I decided to keep my anxious fingers away from the phone for a few more hours and let it continue to charge for the full 8 hours even though it said it was charged. I’m not sure if the battery was charged partially from the factory or if there is a bug with the phone. More than likely it was charged partially from the factory.
Once the phone was charged setting it up was very easy although it did take me a couple of tries getting my password in. It took me a couple of minutes to figure out how to input upper case letters. The phone joined my wireless network without any issues and once I got the username and password into the phone it logged onto Skype without any issues. The phone said that it was downloading contacts for quite a long time. I turned the phone off after 30 minutes, turned it back on and my contacts were there. Other than getting my contacts to appear, set up was very simple.
What I dislike about the phone
The biggest complaint about the phone that I have is how it handles voicemails. The Skype website states: “Voicemail Support: With the purchase of Skype Voicemail, the SMC WiFi Phone will record a short voice message from the caller when your are away.” I assumed that the phone would work much like the Skype software. I assumed that if I did not answer the phone after a few rings the phone would send the caller to voicemail. Unfortunately, this is not the case. In my tests and when others have called me at no time does the call ever go to voicemail. If you let it ring long enough you will get a busy signal but no voicemail.
Although the phone interface is very easy to use, the actual buttons on the phone are very annoying. I find myself having to press the buttons harder than I should at times to make them work. Sometimes it seems as though there is a delay from the time you press the button until the action you desired happens.
The phone supposedly has the ability to update itself over WiFi. I have not been able to test this because the update that I installed when I got the phone enabled the feature and there have been no updates since I installed the latest firmware. When you first get this phone you will definitely want to update it. The phone I received had year old firmware installed. Unfortunately, if you do need to update the software you can only update it on Microsoft Windows with the included USB cable. I find this amusing considering the fact that the phone is running on an embedded Linux distribution.
The time on this phone is always incorrect. Every single time I go into the time settings and change them it will always go back one hour. No matter how many times I have updated the time on this phone it always goes back one hour. Speaking of time, whenever you hold the phone up to your ear you can hear a ticking sound. It sounds exactly like a ticking watch (and no, I do not wear a wristwatch!).
When you are holding the phone up to your ear, ticking is not the only noise you hear. If you are not in a call you can hear the phone making a continuous electronic noise. If you are listening to your voice messages and you have the phone to your ear you can hear the phone downloading each message one piece at a time onto the phone’s internal memory card.
I have made many calls to the Skype Lady (echo123) and whenever she starts speaking it’s really loud, then really quiet. Then when the bells dings for you to start or stop speaking they are really loud and can really hurt your ears. When I have made SkypeOut and calls to other Skype users it is really difficult to hear sometimes what the person is saying unless you hold the phone really close to your ear. Forget using the included earphone, it’s even worse.
The phone is awkward to hold. I really hate the back of the phone because when your run your fingers across it’s surface it sounds like sandpaper. Fortunately, it doesn’t feel like sandpaper! I wish the entire phone was as smooth as the front.
What I like about the phone
I know this is not the most important aspect of the phone but I am really pleased that it is running on a Linux distribution. I love Linux devices and love to see more and more products putting it to use.
I like the fact that this phone is upgradeable. I think that is extremely important in almost any device you purchase these days. I only hope that SMC will kick out some updates to make this phone even better.
I also love the fact that no PC is required in any aspect of setting up or using this phone (other than the initial update that I made). If I am to go on a vacation (unlikely) it will nice to be able to stay in touch using Skype.
Final thoughts and conclusion
Although the phone has it’s flaws I think the phone is a really great idea, especially for someone like me. My computer is really terrible at running Skype while it is running other applications. I normally have to close Skype if I am using Lightroom or Photoshop. For that alone it is worth it. It’s nice to be able to have a standalone device to be able to use as my phone.
It’s also a great concept for people who travel and need to stay in touch with their family, friends, etc. Skype is free for users calling each other and extremely affordable for calling out of the Skype network. When I am able to move into my own place I do plan on using Skype as my land-line alternative. I do plan on having something for emergency calls, though. Don’t forget that you cannot make emergency calls with this phone.
With all the above said I have hard time trying to decide whether I should keep the phone or smash it to pieces. The phone is useful to me in the fact that it does the primary task that I needed it for, that is to be able to answer it quickly when someone calls. However, the fact that it is very hard to hear, the people on the other end have a hard time hearing me and the problem with voice mail really makes me consider sending the phone back. I don’t want to send the phone back because I really love the concept. Regardless, I feel as though I paid for a device that in my opinion does not live up to my expectations.
Article update: Thursday, September 11, 2008: I meant to update this article a long time ago but forgot to. I did send the phone back and received a refund. To my knowledge SMC has not updated the phone’s hardware. Skype has also jacked up the price of this phone from $99 when I bought it to $149. I would definitely stay away from this phone. It’s been almost a year now and I’m still bitter about this phone. I had such high hopes for it. Oh well, at least I got my money back.
If you recall from the Taco HTML article I wrote back in June, I mentioned that my 3 year old Envision LCD (Envision EN7100) decided to kick the bucket. Ever since then, up until the 5th of October (earlier this month, for me) I had been using my backup CRT monitor. I got paid for a web design project in September and I decided that I had put up with the CRT long enough and purchased the 20″ ViewSonic Optiquest Q20WB from NewEgg.
There are a couple of reasons I purchased this monitor, specifically. The first reason is that the monitor has DVI and VGA inputs. One of these days I am eventually going to be able to afford a new computer, hopefully a Mac. The good thing is I won’t have to get a converter for the Mac and if I still have my PC I will be able to switch between the two computers by using the on screen controls. Then just switch between the mouse and keyboard with a KVM switch.
The other reason I purchased this monitor over an Acer or another cheaper brand was because I really wanted something with a good brand name. I realize that Optiquest is a low-end model on the ViewSonic line, at least that is what I read on one of the review sites. I still figured that since all ViewSonic makes is display products that it would be better to go with something from them. I was very much considering an Acer display that was only 19″, it was the same price as the display I bought. I just got to thinking about it and thought that since they made computers and other equipment they might not have the best product.
I was fairly confident that this monitor would work with my system. I was wondering because my PC is a few years old now (I built it in 2003). Luckily I was able to pull it out of the box, plug it in and it worked without any problems. I increased the resolution to the highest resolution (1680 x 1050) and it didn’t puke. I did install the drivers for it, don’t know that it was a necessity because the screen looked great even without the drivers.
I’ve been using the new monitor for over a week now and I am absolutely in love with it. However it has a problem. It shrinks! I’m joking. Just when I pulled it out of the box when I got it and had it on my desk it looked humongous. I kept thinking to myself “How in the world did this thing fit in the box!?” Now don’t let that negate the fact that it is still a large display. It’s really nice to open Lightroom and be able to leave all the panels open and still be able to work on my photos with a large sized editing window. The same goes for coding. I can open Aptana and have all the panels open and still see most of my code. I can also have some code on one side and an IM window on the other side and a document above that. It’s very nice.
There are a lot of controls in the on-screen display. Many more than my Envision had. This Optiquest has controls for adjusting colors, contrast/brightness, the location of the on-screen display, on-screen display language, resolution notices (when you enter a low resolution it displays a message to increase the resolution for optimal performance). You also control the input selection through the on-screen display.
At 20″ the display is larger than my 19″ television. I still have to use the television for playing videos streamed online because for some reason they just appear brighter on my television. I am not sure if it is how the video files are encoded (very low resolution videos) or if it’s just a drawback of LCD technology. Again, don’t let this negate the fact that this is a great display.
The only real problem that I have noticed about this monitor and it’s really not even an issue for me, but, it is wobbly if you bump into the desk or even lightly touch it. It’s not going to tip over but the display sort of wobbles on it’s stand. Again, it’s not an issue. It may even be designed to do that so that the display simply wobbles instead of the stand being pushed back and maybe accidentally turned over.
The only other thing that may be a concern to some people is that widescreen content still does not fill up the entire screen, even though the display is a widescreen display. I don’t have any higher resolution video to try out but I assume with higher resolution video it would fill up the display with no problem at all. When you play a widescreen DVD at the highest resolution there is still letterboxing.
Again, the display is simply gorgeous. It’s very bright. When I look at my iBook now I realize just how dark it is and then wonder how much darker the CRT was because I considered the iBook to be brighter than it! I’d always use the iBook to make sure my photos looked ok after I uploaded them to Flickr! Working on my photos and videos with the CRT monitor just was not cutting it. Whenever I look at photos on the new monitor I am much more impressed with them. I enjoy them a lot more. Whenever I am on Flickr viewing photos from my friends I enjoy them much more because they are brighter and much more spectacular.
At roughly $180 this monitor puts the Apple 20″ Cinema Display to shame. The Optiquest has a 5ms response time whereas the Apple display has a 16ms response time. The Apple display has a 300 cd/m2 brightness rating, so does this Optiquest. I am glad I bought this monitor so I can better save for a new Mac desktop or laptop. Who cares about color coordinating anyway? Heck, sometimes a domino color scheme can be quite interesting!
A month or so ago I was getting ready to call someone on Skype. For some reason I had my Logitech USB headset unplugged. I plugged it in and the volume was extremely loud. Everytime I would go into the volume control (in Windows) and bring the volume down it would simply go back up to the loudest level. I plugged it into the Mac and it wouldn’t do that. You could increase the volume but you could not decrease the volume. The only way to decrease the volume was to adjust it using the OS controls.
I took the switch apart because I thought it might be sticking. While I had the volume control casing removed I plugged it into both computers and it still done the same thing. I put it back together, moved a wire to a different location and still the same thing happened. I figured it was time for a new one. For some reason these things never last as long as they should.
I think the reason the previous headset lasted so long was because I was able to plug it into the USB hub on my desk. With the headsets I had prior to the USB model I was constantly rolling over the cables with my chair because they were plugged into the side of my computer tower. This time I couldn’t afford to pay extra to get the USB model so I purchased the standard analog headset from Logitech.
This new pair looks almost identical to the old pair. The only major difference is the color and the fact that the old one had a USB connector. The new set is a lot more comfortable. The padding is a lot softer. I am able to wear the new set longer without my ears feeling like they are in a vice.
The audio quality of the new set is much better as well. I’ve always been told that analog is a lot better and I definitely agree with those people now. Several people have commented that I sound a lot clearer when I am talking to them on Skype. The only thing that took some time getting use to was listening to music with the new set. I’ve always noticed that with every new set that I get, I have to get use to hearing music through them. It’s never the same.
I feel a lot more confident with the audio and microphone controls that are a part of the cable. They feel solid. The volume control is different. Instead of it being on the side of the control it’s in a dial, like a clock. It’s not as easy to accidentally turn the volume all the way up or down, which is nice. With the previous set (the USB set) I was all the time accidentally muting myself because to mute the microphone you pressed down on the top of the control, if I were to lean against my desk I would press it without knowing it.
The price was great. I got it from a store on Amazon for under $20 (including shipping). If you’re in the market for a good cheap headset, I would recommend this one.
Last night I decided to go ahead and try to get the official Nvidia drivers installed for my GPU on Fedora 7. I was hesitant to do this because normally whenever I try to do this I break something and wind up having to re-install the entire operating system because I can’t figure out what I need to change in my x.org configuration file to make it work again. Fortunately, last night I had better luck.
I followed the instructions on this site first. When I’d reboot, the X-Server wouldn’t work probably. The text login screen would blink three times then a blue screen would come up saying that X was unable to be started. Eventually it would fix itself and I was able to login graphically. The driver was being installed but it was not directly rendering.
I then found this entry on another site that said SELinux causes the driver to not install correctly. I thought that might have been the issue so I disabled SELinux and the firewall, restarted, still got the same thing.
After about 30 minutes I finally found this entry on another site that made me realize that I was installing the wrong drivers for my video card. The GeForce2, 3 and 4 (including MX) cards are not supported by the 97xx drivers, you have to use the 96xx series.
I finally got the correct drivers installed and everything working properly, even the desktop effects work. I thought in case I have to do this again and in case someone else has the same card that I do I would make an entry about how I got the drivers installed:
Open up a terminal window, login as root by entering su – and pressing enter at the prompt. Enter your root password and press enter.
Enter the following command: rpm -ivh http://rpm.livna.org/livna-release-7.rpm and press enter.
Enter the following command: rpm –import /etc/pki/rpm-gpg/RPM-GPG-KEY-livna and press enter.
Enter the following command: yum install kmod-nvidia-96xx xorg-x11-drv-nvidia-96xx and press enter. (Remember to put spaces between the two applications)
Once everything has been installed enter the following command service nvidia-96xx restart
At this point, I rebooted the machine just to make sure everything was installed correctly. Upon restart you should see a green Nvidia logo pop up, it may fade up depending on whether or not the desktop effects were enabled during the installation.
I went ahead and posted my own instructions for doing this because I wasn’t able to follow the instructions on the last link the way they had it wrote out. I did link to them so you can see where I got most of the information from.
I’d highly recommend removing the Livna repositories from your YUM sources. I had issues trying to install other software while Livna was still in my sources list. To remove Livna following these steps:
Open up a terminal window, login as root by entering su – and pressing enter at the prompt. Enter your root password and press enter.
Enter the following: cd /etc/yum.repos.d/ and press enter.
For me there were only 3 Livna repository files to remove, I used the following command to remove them: rm livna-devel.repo livna.repo livna-testing.repo. (Remember to put spaces between each file name). When you press Enter you will be asked if you are sure you want to remove the files, enter “Y” for each and press enter.
The only thing I’ve yet to figure out is how to get the TV-Out functionality to work. I know it’s possible, it’s just going to take some tweaking on my part. I got it to where I could see some text on the TV last night but it wasn’t readable, nor was the text on the default display so I had to kill the X server everytime (Ctrl + Alt + Backspace). Luckily it would reset itself back to the standard every time.
Hope someone finds this article useful. I know I will be appreciative of it in the future if I have to re-install Fedora.