Purpose
These steps will guide you through the process of setting up a Debian-based Linux distribution with Apache, MariaDB, PHP, phpMyAdmin, and WordPress.
Pre-Requisites
- You understand that the purpose of this tutorial is for setting up a WordPress instance to be used in a locally hosted environment by a limited set of users. If you wish to use these steps for a production environment, you will need to perform additional security hardening.
- You already have a computer or virtual machine prepared with a Debian-based Linux distribution.
- You have sudo privileges.
- You have SSH and SFTP access to the server.
- For the purposes of this tutorial, we will be remoting into the Debian-based Linux computer.
Steps to Install Apache, MariaDB, PHP
1.) Issue the following command to update the package list.
sudo apt-get update2.) Issue the following command to install Apache, MariaDB, and PHP. Accept the additional packages to be installed.
sudo apt-get install apache2 mariadb-server php3.) Confirm successful installation of Apache by navigating to http://YOURIPADDRESS or http://YOURHOSTNAME
- Note that we are using HTTP vice HTTPS.
- If unsuccessful, confirm that you do not have a firewall blocking your access.
4.) Confirm successful installation of MariaDB by issuing the command below. Without specifying credentials, you should receive an “Access denied” message. This will suffice for now.
mariadb5.) Confirm successful installation of php by issuing the following command to identify the version that is installed.
php -vSteps to Configure an Apache Site
1.) Create a dedicated user account for the site.
sudo adduser websiteaccountusername2.) Provide a password and user details (e.g., Name, Location, etc.) for the new user account.
3.) Once the new user account has been created, add the account to the www-data group.
sudo usermod -aG www-data websiteaccountusername4.) Switch into the websiteaccountusername account to build the directory structure. Use the following command and enter the password when prompted.
su websiteaccountusername5.) Ensure that you are in the websiteaccountusername home directory.
cd ~6.) Issue the following command to build the necessary directories.
mkdir -p ~/htdocs/{logs,public_html}7.) Exit out of thewebsiteaccountusername account. You should now be back in your normal account that you use to administrate the server.
exit8.) Update the permissions of /home/websiteaccountusername/htdocs so that Apache can access them. Issue the following commands.
sudo chown -R websiteaccountusername:www-data /home/websiteaccountusername/htdocssudo chmod -R 755 /home/websiteaccountusername/htdocs9.) Grant Apache the ability to traverse /home and /home/websiteaccountusername. Issue the following commands.
sudo chmod o+x /homesudo chmod o+x /home/websiteaccountusername10.) Navigate to the /etc/apache2/sites-available directory. Once there, we will create a new file using nano.
cd /etc/apache2/sites-available/sudo nano yoursitenamehere.conf11.) Populate the contents of yoursitenamehere.conf with the following.
<VirtualHost *:80>
ServerAdmin webmaster@localhost
DocumentRoot /home/websiteaccountusername/htdocs/public_html
<Directory /home/websiteaccountusername/htdocs/public_html>
Options +Indexes +FollowSymLinks
AllowOverride All
Require all granted
</Directory>
ErrorLog ${APACHE_LOG_DIR}/yoursitenamehere_error.log
CustomLog ${APACHE_LOG_DIR}/yoursitenamehere_access.log combined
</VirtualHost>
12.) To avoid any potential conflicts with the default site that Apache creates, disable it.
sudo a2dissite 000-default.com13.) Enable the virtual host and restart the Apache service by issuing the following commands.
sudo a2ensite yoursitenameheresudo systemctl reload apache214.) Open a web browser and navigate to http://YOURSERVERIP or http://LOCALHOST to confirm access.
Steps to Secure the MariaDB Installation
sudo mysql_secure_installation2.) You will be prompted for the current root password of MariaDB. Since there is currently no password, press Enter.
3.) Perform the additional security tasks, when prompted.
Switch to unix_socket authentication? No
Change the root password? Yes
Remove anonymous users? Yes
Disallow root login remotely? Yes
Remove test database and access to it? Yes
Reload privilege tables now? Yes
4.) You can further confirm access to MariaDB by logging into the database from the console. Otherwise, we will proceed with installing phpMyAdmin for database administration. NOTE: When finished, type exit; (exit followed by a semicolon).
mariadb -u yourusernamehere -pSteps to Create a User Account for Database Management
1.) Issue the following command to access the MariaDB console.
sudo mariadb2.) Issue the following commands to create a new user account and grant all privileges to that user. Replace USERNAME and PASSWORD (between the single quotes) with your desired username and password.
CREATE USER 'USERNAME'@'localhost' IDENTIFIED BY 'PASSWORD';GRANT ALL PRIVILEGES ON *.* to 'USERNAME'@'localhost' WITH GRANT OPTION;3.) Type exit and press Enter to exit the MariaDB console.
Steps to Install phpMyAdmin
1.) Issue the following command to begin the process to install phpMyAdmin. Accept the additional packages to be installed.
sudo apt-get install phpmyadmin2.) When prompted, select apache2 from the list of web server options.
3.) When prompted, allow the installer to configure a database for phpMyAdmin with dbconfig-common.
4.) When prompted, enter a password for the phpMyAdmin database user account.
Steps to Logon to phpMyAdmin to Create Databases
Using the following steps, we will logon to phpMyAdmin and create a database and database user account for our WordPress installation.
1.) Navigate to http://YOURIPADDRESSHERE/phpmyadmin
2.) Login using your database manager user account.
3.) Click on the User accounts button along the top.
4.) Click on Add user account.
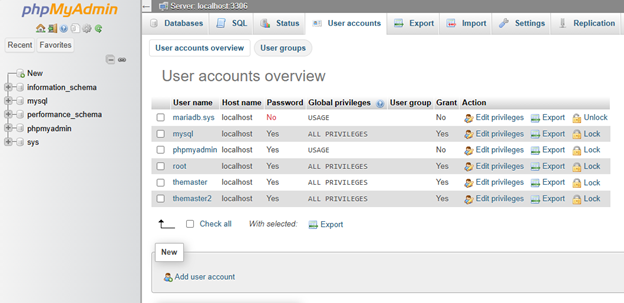
5.) Specify username and password.
6.) Select the option for Create database with same name and grant all privileges.
7.) Click on Go.
8.) Your new database should appear in the sidebar. If it does not, click on the Home icon.
Steps to Install WordPress
The following steps will be performed from a Windows desktop. The steps are similar, if not the same on other OS’.
1.) Download the latest version of WordPress from WordPress.org (6.7.2 as of this writing) and extract the ZIP file.
2.) Rename wp-config-sample.php to wp-config.php and open it in your preferred text editor (Notepad on Windows will suffice).
3.) Populate the applicable fields with your database information (i.e., database name, user, password, and host). Since we are hosting locally, leaving ‘localhost’ is fine.
4.) Navigate to the WordPress.org Secret-Key Service to generate your secret keys (https://api.wordpress.org/secret-key/1.1/salt/ is the current URL).
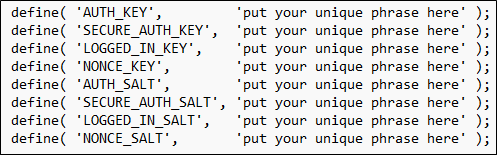
Once generated, replace the defaults.
5.) Connect to your server using SFTP.
6.) Navigate to /home/websiteaccountusername/htdocs/public_html
7.) Upload the contents of your local WordPress files.
8.) Open a web browser and navigate to http://YOURSERVERIP or http://LOCALHOST.
9.) You should now be presented with a WordPress installation screen. Follow the steps to complete.