Last month (May 2007) I wrote a blog entry about Aperture. At the time I was house sitting for my sister who had just got a new iMac. When I came home I was disappointed that I didn’t have a similar application to use for working on my photos. Last fall I had played with the Adobe Lightroom Beta and it was extremely slow on my computer so I didn’t really give it much thought. Then I decided to download the trial and give it a shot anyways after thinking that it might actually perform better now that I have a dedicated graphics card with 128MB of memory instead of the motherboard’s integrated GPU which only had 32 MB of RAM allocated to it. The following will be my thoughts of Lightroom and I will be comparing a lot of it’s features with the experience I had with Apple’s Aperture.
Features I Really Liked
When you first open Adobe Photoshop Lightroom you are asked where you want to import images from. You can choose to import images from your camera or from a location on your computer. Once you choose and your images have been imported they are placed into the Library. You’ll also probably want to change the view from “Loupe View” to “Grid View.” This will allow you to see all of the images that you just imported. Also, it’s easier to go ahead and rotate your images from this view before you get to adjusting the images. Once you do get your images rotated and you are ready to start adjusting them, click on an image that you want to work on and then click on Develop, this is where all the adjustments will take place.

When you’re in the “Develop” mode there are a lot of adjustments that you can make. The first adjustment that I usually make is the white balance, exposure and contrast. Lightroom has a few pre-programmed presets for adjusting tone curve and this is what I usually use because they seem to work pretty well for me. If you find yourself applying the same adjustments to more than one or two images you can create additional presets.

The next adjustments that I make are of the colors. This is my favorite feature and one that really makes Aperture and Lightroom worth their pricetags. My camera doesn’t do a great job of applying saturation to images, which is acceptable in some instances because the camera might apply too much and it would be hard to correct in post processing. I usually find myself increasing the saturation of blues to make skies bluer and greens to make leaves much more vibrant. If the color you see is a bit odd from what you remember seeing you can change it’s hue and luminance.
I want to talk a little bit more about the lighting adjustments that you can make using Lightroom. You can use the tone curve tool or you can use sliders to adjust the lightness or darkness of highlights, dark areas, light areas and shadows. You’d be surprised by just how much better you can make an image look by slightly tweaking the tone curve.
An adjustment that I find myself needing quite frequently is a sharpening tool. Lightroom’s got one and you don’t have to add it to the panels every time you open a new image like I did in Aperture but, I have never seen any difference when I have used this tool. I don’t know whether it’s so subtle I just don’t see a change or if my monitor just isn’t all that great. What I’ve been doing is when I’m finished with the photo I export it out and sharpen it up in an external editor.
When you have finished editing the photo and are satisfied with it you can add a star to it. You can add 1-5 stars to each image. I usually apply a 5 star rating to images that I’m going to export and upload to Flickr. There is also a feature that let’s you add images to a “Quick Collection.”
If you’ve got multiple images of the same thing and you need to compare them Lightroom has you covered there as well. The only downside to Lightroom’s comparison feature is that you can only compare one photo at a time.
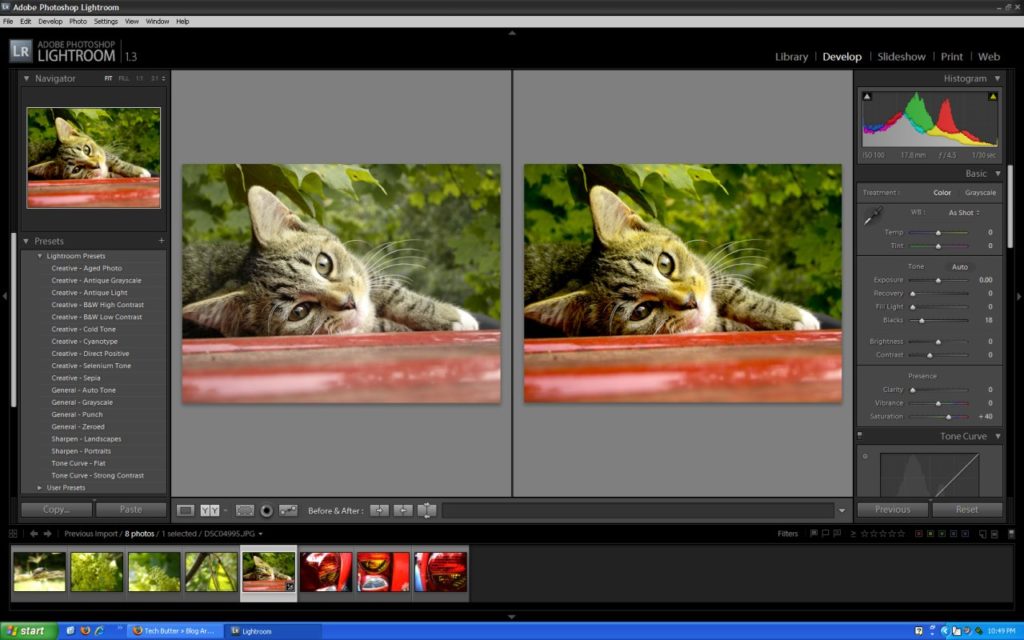
In addition to the comparison tool Lightroom has a tool that I really like called “Before & After.” I really like to use this to see just how much better my images are once I’ve adjusted the lighting, saturation, etc.
Another great feature of Lightroom that most good photo editing applications are incorporating these days is non-destructive edits. Like I mentioned in the Aperture review, it is really nice to be able to make changes to images and a year later come back and still have the original images. You’ll want to make backups of course, which is built into Lightroom, but, every good photo editing application will have this.
I am happy to say that cropping images in Lightroom is much easier than it was in Aperture. At least the figuring out how to do it part. When I was using Aperture it took me a while to figure out how to crop an image, in Lightroom it was much easier to understand. What I really liked about Lightroom is that when I cropped an image and made changes to the image, if I zeroed the image out the crop would stay. I thought that was really nice.
What I Was Not So Happy With
Lightroom is resource intensive. I know I don’t have the most powerful computer on the planet, but still, it’s resource intensive. I couldn’t use the application if my computer’s display was running at 1280×1024, I’d have to decrease to 1024×768. I had to close out of all other applications that I was running. Even running Skype and Lightroom at the same time would cause my computer to lockup. Even with closing all applications Lightroom still isn’t very fast, sliders occasionally become unresponsive and images take their precious time loading. You really need a modern computer to use Lightroom effectively, something faster than my AMD Athlon XP 1700+, 128 MB GPU and 1 GB of RAM.
Features I Would Like To See
If you need to see what your image looked like before you applied an adjustment you can use the history panel. In my opinion it’s not as nice as Aperture’s ability to hide an effect by clicking on a hide icon beside of the adjustment.
Another feature that I really miss from Aperture is full screen editing. You can hide panels very easily in Lightroom, too easily sometimes, but it doesn’t compare to being able to edit an image in full screen mode. I really miss that and hope to see it in Lightroom soon.
Like I mentioned previously, in my opinion the sharpening tool does not do anything for images. I’d like to see this corrected. Also, I’d like to see some sort of tool to go along with the sharpening tool so you can further define where you want to apply the sharpening to.
Final Thoughts
Although Lightroom is missing a lot of things that I really liked when I was using Aperture, I think Lightroom is a great piece of software. It’s only at Version 1.0 at the moment so I’m sure better things are to come. If you’re needing photo editing software and you’re on Windows, I would highly recommend Adobe Photoshop Lightroom. If you’re using a Mac, I’d recommend sticking with Aperture. Both Lightroom and Aperture are $299, which in my opinion is a bit steep. However, it is cheaper than buying a copy of Adobe Photoshop and both applications are much easier to work with than trying to learn how to edit your photos in Photoshop.