I have been seeing a lot of articles lately about high dynamic range (HDR) photography. I’ve always been fascinated by it. I read through a couple of blog entries and decided that I should try it myself. In the past I have said that I couldn’t do things like HDR due to the limitations of me only having a point and shoot camera. However, I have since learned that there is a lot that I can do with my camera it just takes a lot of practice, patience and a good eye. I went out and I took some photos and I wanted to make an entry about how I took the photos as well as show you how I got the final image.
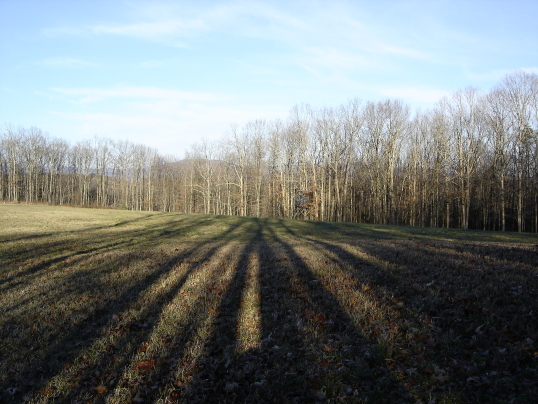

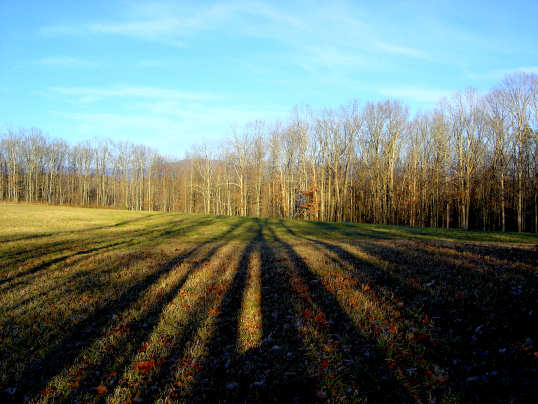
The images above are as follows. The first image is a photo of the scene taken at normal exposure. The second image is a composited image created from 3 images at different exposures. The last image is after adjustments have been made to the composited image to make it look more like what I saw while I was taking the photo. If you click on the photos you can see a larger version of each in a light box.
Selecting a scene
The first thing you’ll want to do is to select something to take a photograph of, duh! Taking photos using the HDR process is a little bit more time consuming. I’ve noticed that since I have been using this process I’ve taken photos of fewer scenes. This also means that I have taken better photographs because I’m thinking about what would look best in the final output image.


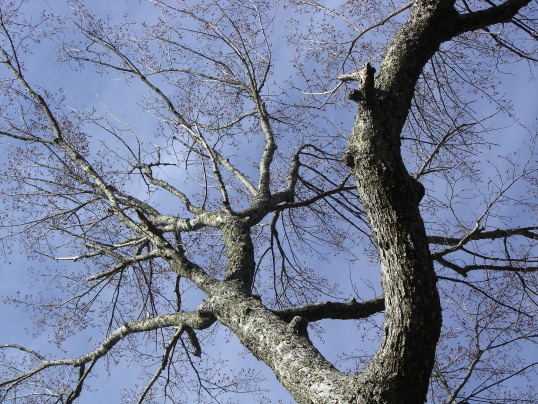
Choose a scene that is not going to change for about 2-5 minutes. This time of course depends on how fast you can change the exposure of your camera to take the next photo. Some point & shoot cameras and dSLR cameras give you the ability to take photos at multiple exposures at the same time. If you have this feature you’ll definitely want to take advantage of it so you can take photos of objects that aren’t completely still. In the example below you’ll see an HDR image of the top of a tree. You’ll notice there is quite a bit of blur. Silly me wasn’t thinking about the tree moving whenever I took the photo. I think the photo is interesting but not of the highest quality.


Shoot something that you have shot in the past but it didn’t turn out the way you had hoped. Look for shadows and anything that will have detail in the final image. Taking the photos at multiple exposure values will allow many of the details that you see with your eyes to come out in the final image. I like to look for shadows cast onto the ground, rolling hills or a gorgeous blue sky.
Shooting the scene at multiple exposures
Although my camera has a manual mode I have been taking my shots using “Program auto shooting” which on other cameras is called “Aperture priority.” Using this setting the camera gives me more options for adjusting the focus and fine tuning the capture options. Once in Program auto shooting I set up the scene: zoom, white balance, ISO, etc. I would highly recommend taking your photos in this mode or a similar mode on your camera since you have more control over the photos. Don’t use the auto mode, your photos will never turn out all that great in my opinion.
Look for a setting that allows you to change the exposure compensation. On my camera it is in the menu options and is called “EV.” Most cameras allow you to go all the way up to +2.0 and down to -2.0. In the several photos that I have taken and used the HDR technique I have found taking shots at 0EV, +1EV and -1EV is plenty. The more images you take the more likely the images will be blurred due to something in the scene moving. If you want to take your photos by adjusting the shutter speed have a look at this tutorial.
Some cameras (even point and shoot) have a setting that will allow you to take multiple photos at different exposures at the same time. If you are lucky enough to have this on your camera take advantage of it.
As you are taking a photo of each scene you might want to make a new folder on your memory card for each scene. This will allow you to organize your scenes a little better and keep the multiple exposures of the scene in the same folder. If you take multiple sets of photos of the same scene this really helps.
Always shoot with a tripod. If you don’t have a tripod you’ll definitely want to get one. It is crucial. When you are shooting the photos at multiple exposures you’ll want to take a photo of exactly the same thing. During the compositing process the photos will be merged, any slight movement will show a blur. Along with using a tripod you’ll also want to use an auto timer of a few seconds to minimize camera shake.
Combining the images
Once you have got the images off of your camera you’ll need to combine them. I am using FDR Tools Basic on Windows which is also available for Mac OS X 10.3.9 or later.. I am using the basic free version which seems to do really well. Another freeware tool for Windows is HDRShop or Qtpfsgui. Qtpfsgui also works with Linux or the Mac. If you have Adobe Photoshop you can use the “Merge to HDR” function.
To edit the final output image you’ll need an image editing tool. If you have Photoshop definitely take advantage of it as you’ll be able to work with more than 8 bits which will give you a better output image. Although the GIMP only offers 8 bits I’ve been using it to edit the final output image and getting decent results. If you don’t have Photoshop I would highly recommend The GIMP, since it’s free and works on Mac (using X11), Windows and Linux. You could also use CinePaint which is capable of handling 8, 16 and 32 bit images.

Open up FDRTools Basic, click on Images >> Open, navigate to your set of 3 images, highlight them and click on Open. FDRTools will then begin to put the images together. Once the images are combined you can tone map the image (tone mapping button at the top) but I’d recommend simply saving the image out as a JPEG and editing the final image in The GIMP, Photoshop, CinePaint or another program of your choice.
Adjusting the composited image
Before you start editing the image that you saved out of FDRTools make a copy of it somewhere. On my computer I keep a folder for “Originals” and another folder for “Edited” photos. If you make a mistake or later decide you don’t like the adjustments you have made you can change them later. If you’re using Aperture, Lightroom, Picasa or another non-destructive editing program you won’t have to worry about this unless you are just a fussy person like myself who likes keeping things tidy!
When you open the image in The GIMP it will ask you if you want to convert the image to the RGB working space. You should always work with your photos in the RGB color space so I always have the image converted from whatever embedded format the photo has.
Once the image has been converted and opened the first thing I do is go to Colors >> Levels. Under “Input Levels” I move the sliders around until I get something that I like. You may have to add contrast or adjust the white balance but usually just moving the input level sliders around will give me a great result.
Another quick way of getting the colors right is by adjusting the white balance. In the Levels dialog box select the “white” dropper and choose a white spot on the photo. Then choose the “black” dropper and choose a completely black spot on the photo. This is usually better than adjusting the levels with the input levels slider but sometimes it’s very hard to find a white spot on a photo.
Once you have adjusted the image to your liking simply save the photo and share it! There are many groups for HDR photography on Flickr that you could join and post your images to and get tips on them for the next time.
I recorded a video tutorial for this post which you can download a high resolution version of using the link below. If you prefer to stream the video tutorial use the Vimeo player at the bottom of this post.
High Dynamic Range (HDR) Photography from andymelton on Vimeo.