Over the weekend I had a great opportunity to help someone move from TypePad to WordPress running on their web hosting account. The reason the person wanted to do this is because they were no longer going to continue paying for their TyePad account. Understandable considering the fact that the person was paying for TypePad on top of their web hosting account.
Moving the Posts
Fortunately, getting the TypePad blog entries backed up and imported into WordPress was one of the simplest tasks to take care of. The first step is to login to your TypePad account and click on the Edit Posts link. Then you click on Import/Export. Once TypePad makes a backup of all your entries, which it will do in one file, you can right click on that file and save it to your computer.
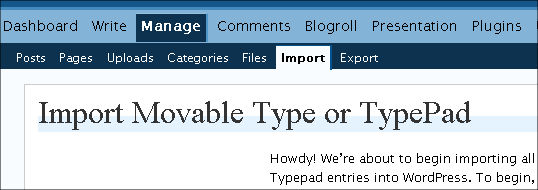
The next step is also very easy to do. That is getting the posts you just exported into WordPress. All you have to do is go to your WordPress installation, login to the administration area, click on Manage, then Import. On the import page select “Movable Type and TypePad”. On the next page, click the browse button and find the file that you exported from TypePad (the file I downloaded from TypePad was an HTML file). Once you find the file click on “Upload file and import” and WordPress will import your posts into it’s database.
Moving Images from TypePad to WordPress
TypePad like any good blogging service allows it’s users to upload images to their servers so that images can be placed into blog posts. Although that’s a really great feature to offer the problem is what happens if you need a backup or want to move your images elsewhere? The solution that TypePad suggests and the one that I followed worked quite well. That is to use a program called Getleft. If you’re on a Mac you can use SiteSucker. These two programs download all of the files from a website as long as they are linked. Open the program, plug in the URLs and start the download process. When I did this I had to let it run for several hours before it got all the data. Once the software has downloaded the files you’ll want to upload the backup to your web hosting account. A great place to put these files is in your uploads folder (root directory/wp-content/uploads/).
Once you’ve got the files into the uploads folder the next thing that you’ll want to do is get the images re-linked. You could go through every single post and re-link the images by hand OR you could download the Search and Replace plugin. Download the plugin, extract it and upload it to your plugins directory (root directory/wp-content/plugins). Once it is on the server, go back to the WordPress administration area, go to Plugins and click on Activate for Search and Replace.
After the plugin has been installed, in your WordPress administration area click on “Manage” and then “Search and Replace.” The next step is a bit tricky. You need to find out the old URL and the new URL. You can get an idea of what I used from the screen shot below.
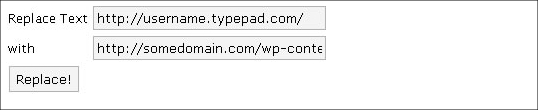
You can then click on “Replace!”. Once the process has completed go back to your blog and make sure that the images have been re-linked properly. Go back through your archives and see that images on old posts are linked properly as well.
Creating an authors list
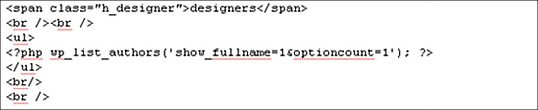
The person that I did this for had a blog where several people contributed and they wanted to have a list of the authors on the sidebar. The idea is when you click on the author’s name you’ll get a page with all that author’s posts. I’ve inserted a screen shot below. From this you can tell how I integrated the required code into the sidebar of the theme this person chose.
Scratching the surface
I’m sure there are more features that could be ported over from TypePad to WordPress and I am sure a lot of them have been. What I have mentioned above is simply what I did on this particular project. If you’ve got other suggestions feel free to leave them in the comments section.
One last piece of advice. Before you start blogging you’ll want to set up Akismet and a backup schedule for your new WordPress blog along with other plugins that you might want to use.